Git is a version control system that records changes to files over time. It lets teams:
Work in parallel without overwriting each other’s work.
Review history of changes (who changed what, when, and why).
Create branches to try out ideas safely and merge them back.
Recover earlier versions if something breaks.
CautionCaution
Always work inside a project folder that contains all files of one project (e.g., ~/projects/myproject/). Never initialize or connect Git in your home or root directory or in hub-public.
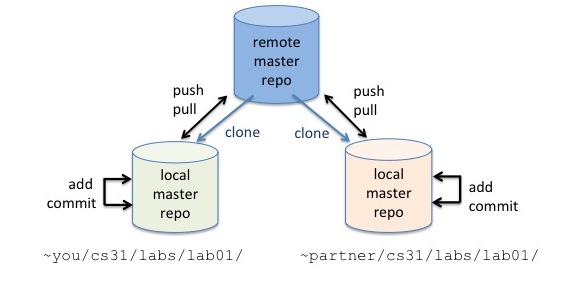
1.1 How Git + GitLab work (mental model)
Local repository (on JupyterHub or your own computer):
This is your project folder. It contains your files and a hidden history (the “repo”). You make changes here and take snapshots of them.
Central repository (on GitLab):
This is the shared, authoritative copy your whole team uses. Everyone pushes their snapshots to GitLab and pulls the latest snapshots from it.
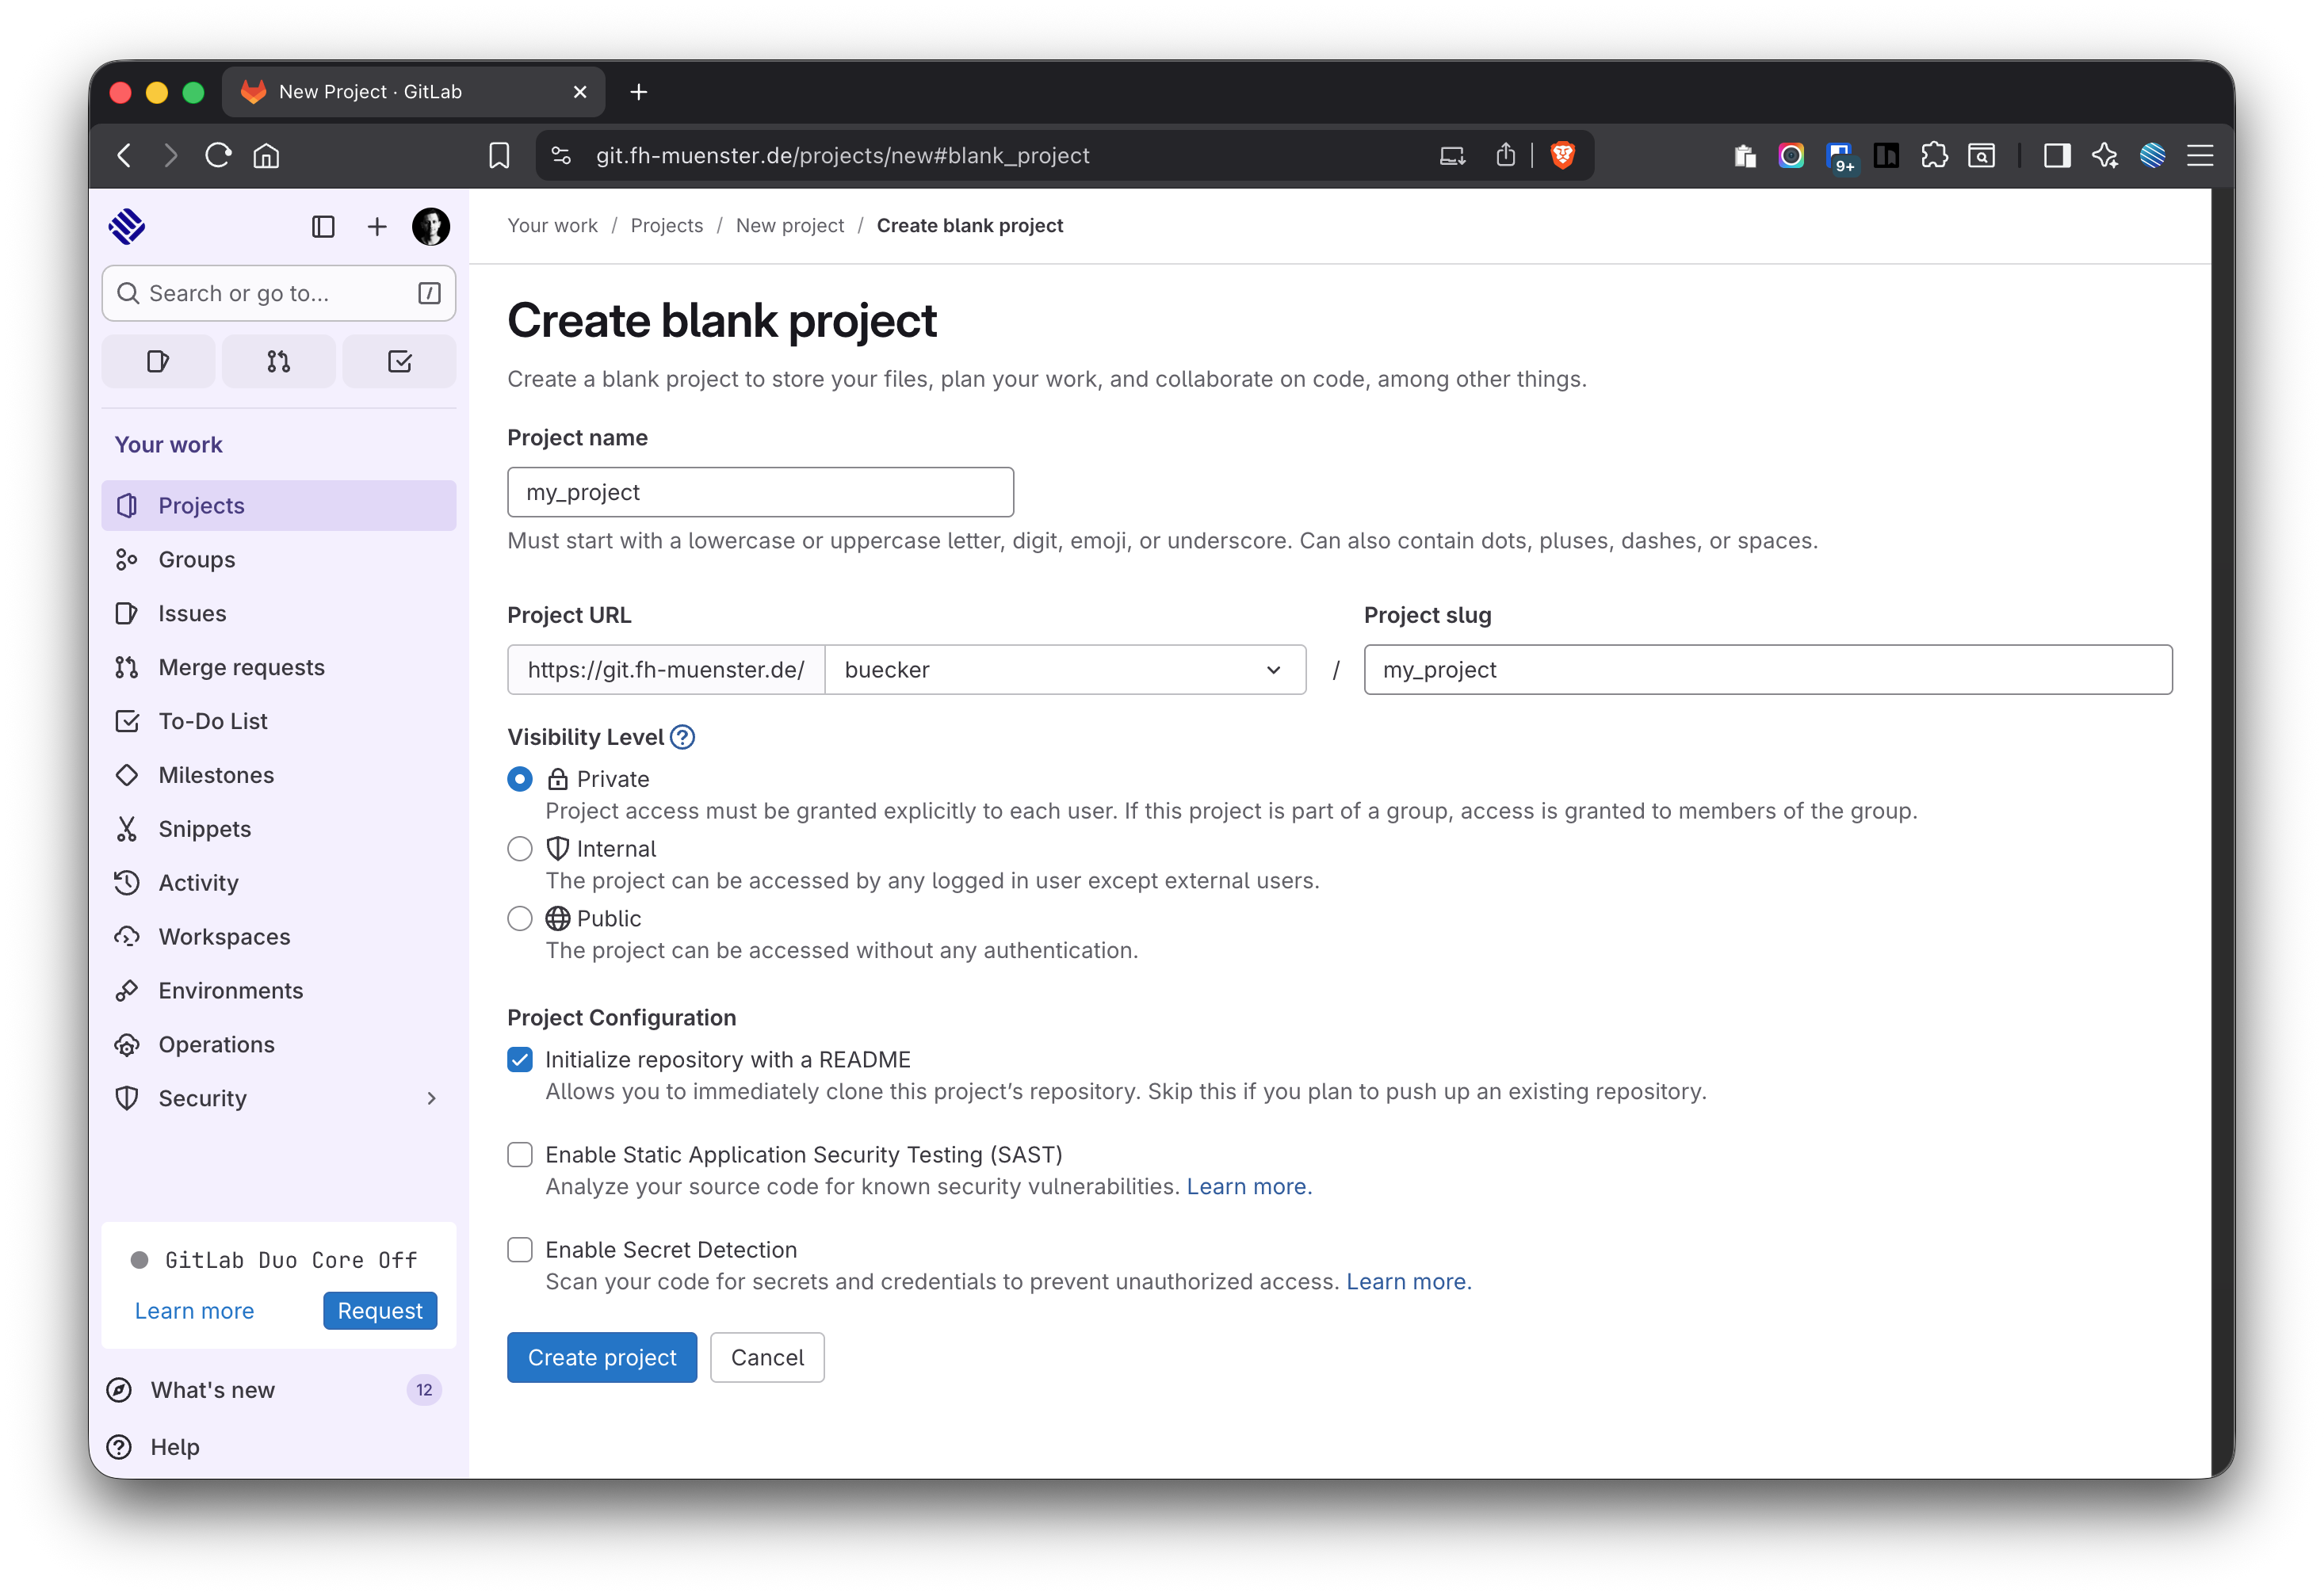
Visibility: choose Private (recommended for coursework).
Initialize repository with a README: (makes the first commit).
Create the project.
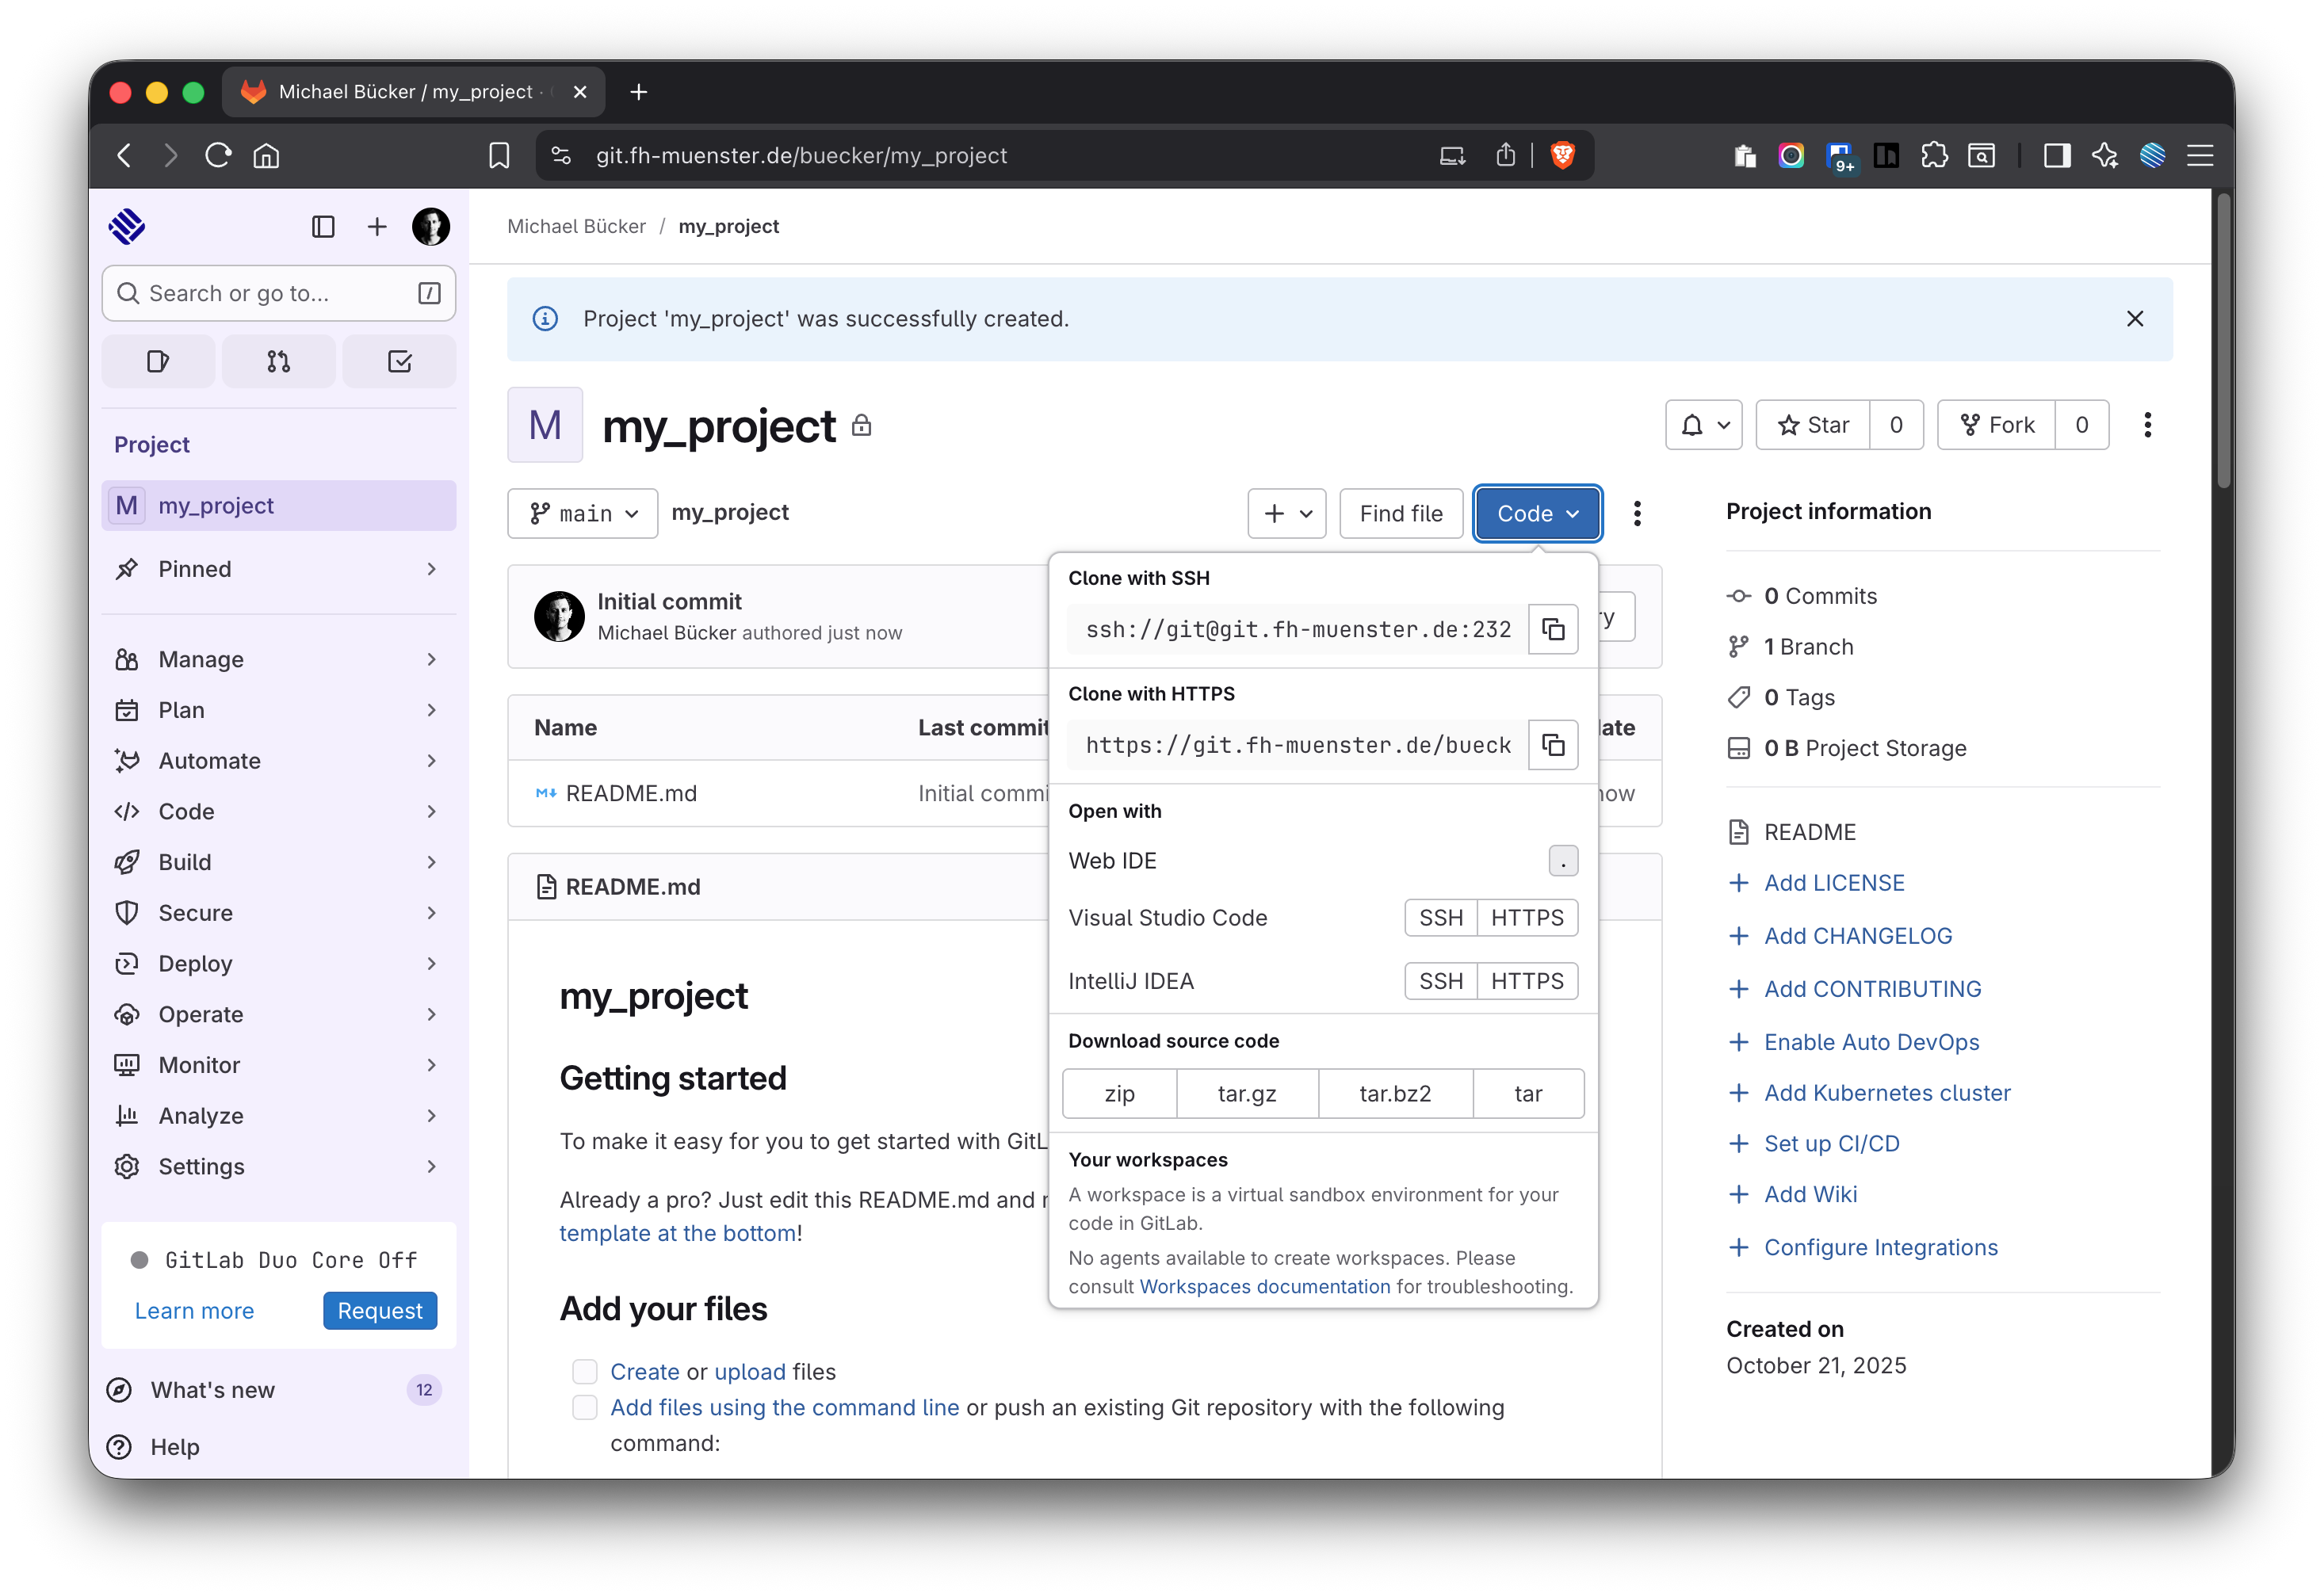
After creation, GitLab shows HTTPS and SSH clone URLs. For beginners, use HTTPS. The clone URL is under “Code”. You’ll need it in JupyterHub (Figure 7).
Figure 4: Create a new project/repository in GitLab by clicking on “+” or “New project”
Figure 5: Select blank project to create a new repository
Figure 6: Give your project a name and make it private
Figure 7: Copy the HTTPS path to clone the repository to JupyterHub later
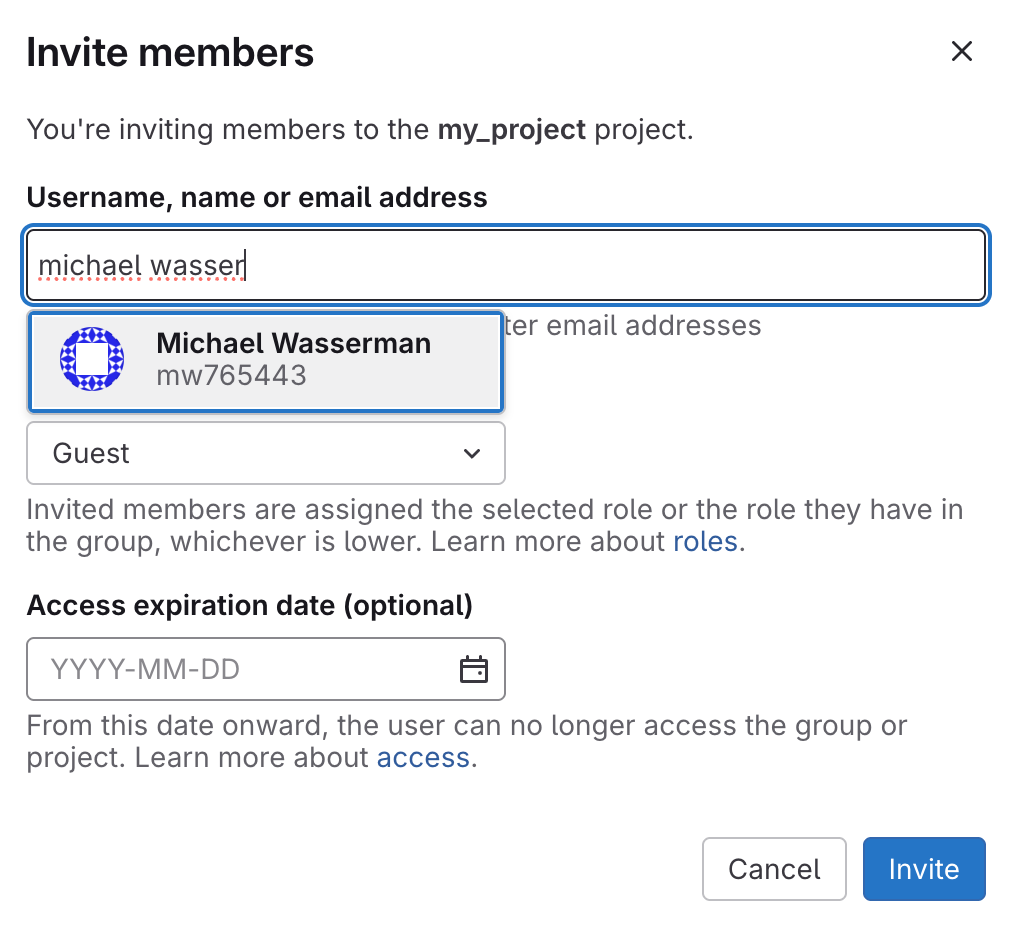
2.3 Inviting collaborators to a Git repository
Open your project page in GitLab.
Go to Manage → Members.
Add teammates by their name or FH username (Figure 8)
Role:Developer (can push to branches) is appropriate for team members.
Set an optional expiration date (for time-boxed courses), then Invite.
Only the Repo Owner (or a Maintainer) can invite members. For coursework, Developer access is typically sufficient.
Figure 8: Invite team members to your repository with a specified role
2.4 The .gitignore file
A .gitignore file tells Git which files and folders not to track. This keeps your repository clean (no secrets, no huge files, no machine-specific clutter) and avoids merge noise.
Key points
Git only ignores files that are not yet tracked. If you already committed a file, Git will keep tracking it until you remove it from the index.
Patterns apply relative to the repo root (where .gitignore lives).
You can have multiple .gitignore files (one at the root, plus optional ones in subfolders).
For personal, machine-local ignores, use global ignores instead of polluting project repos.
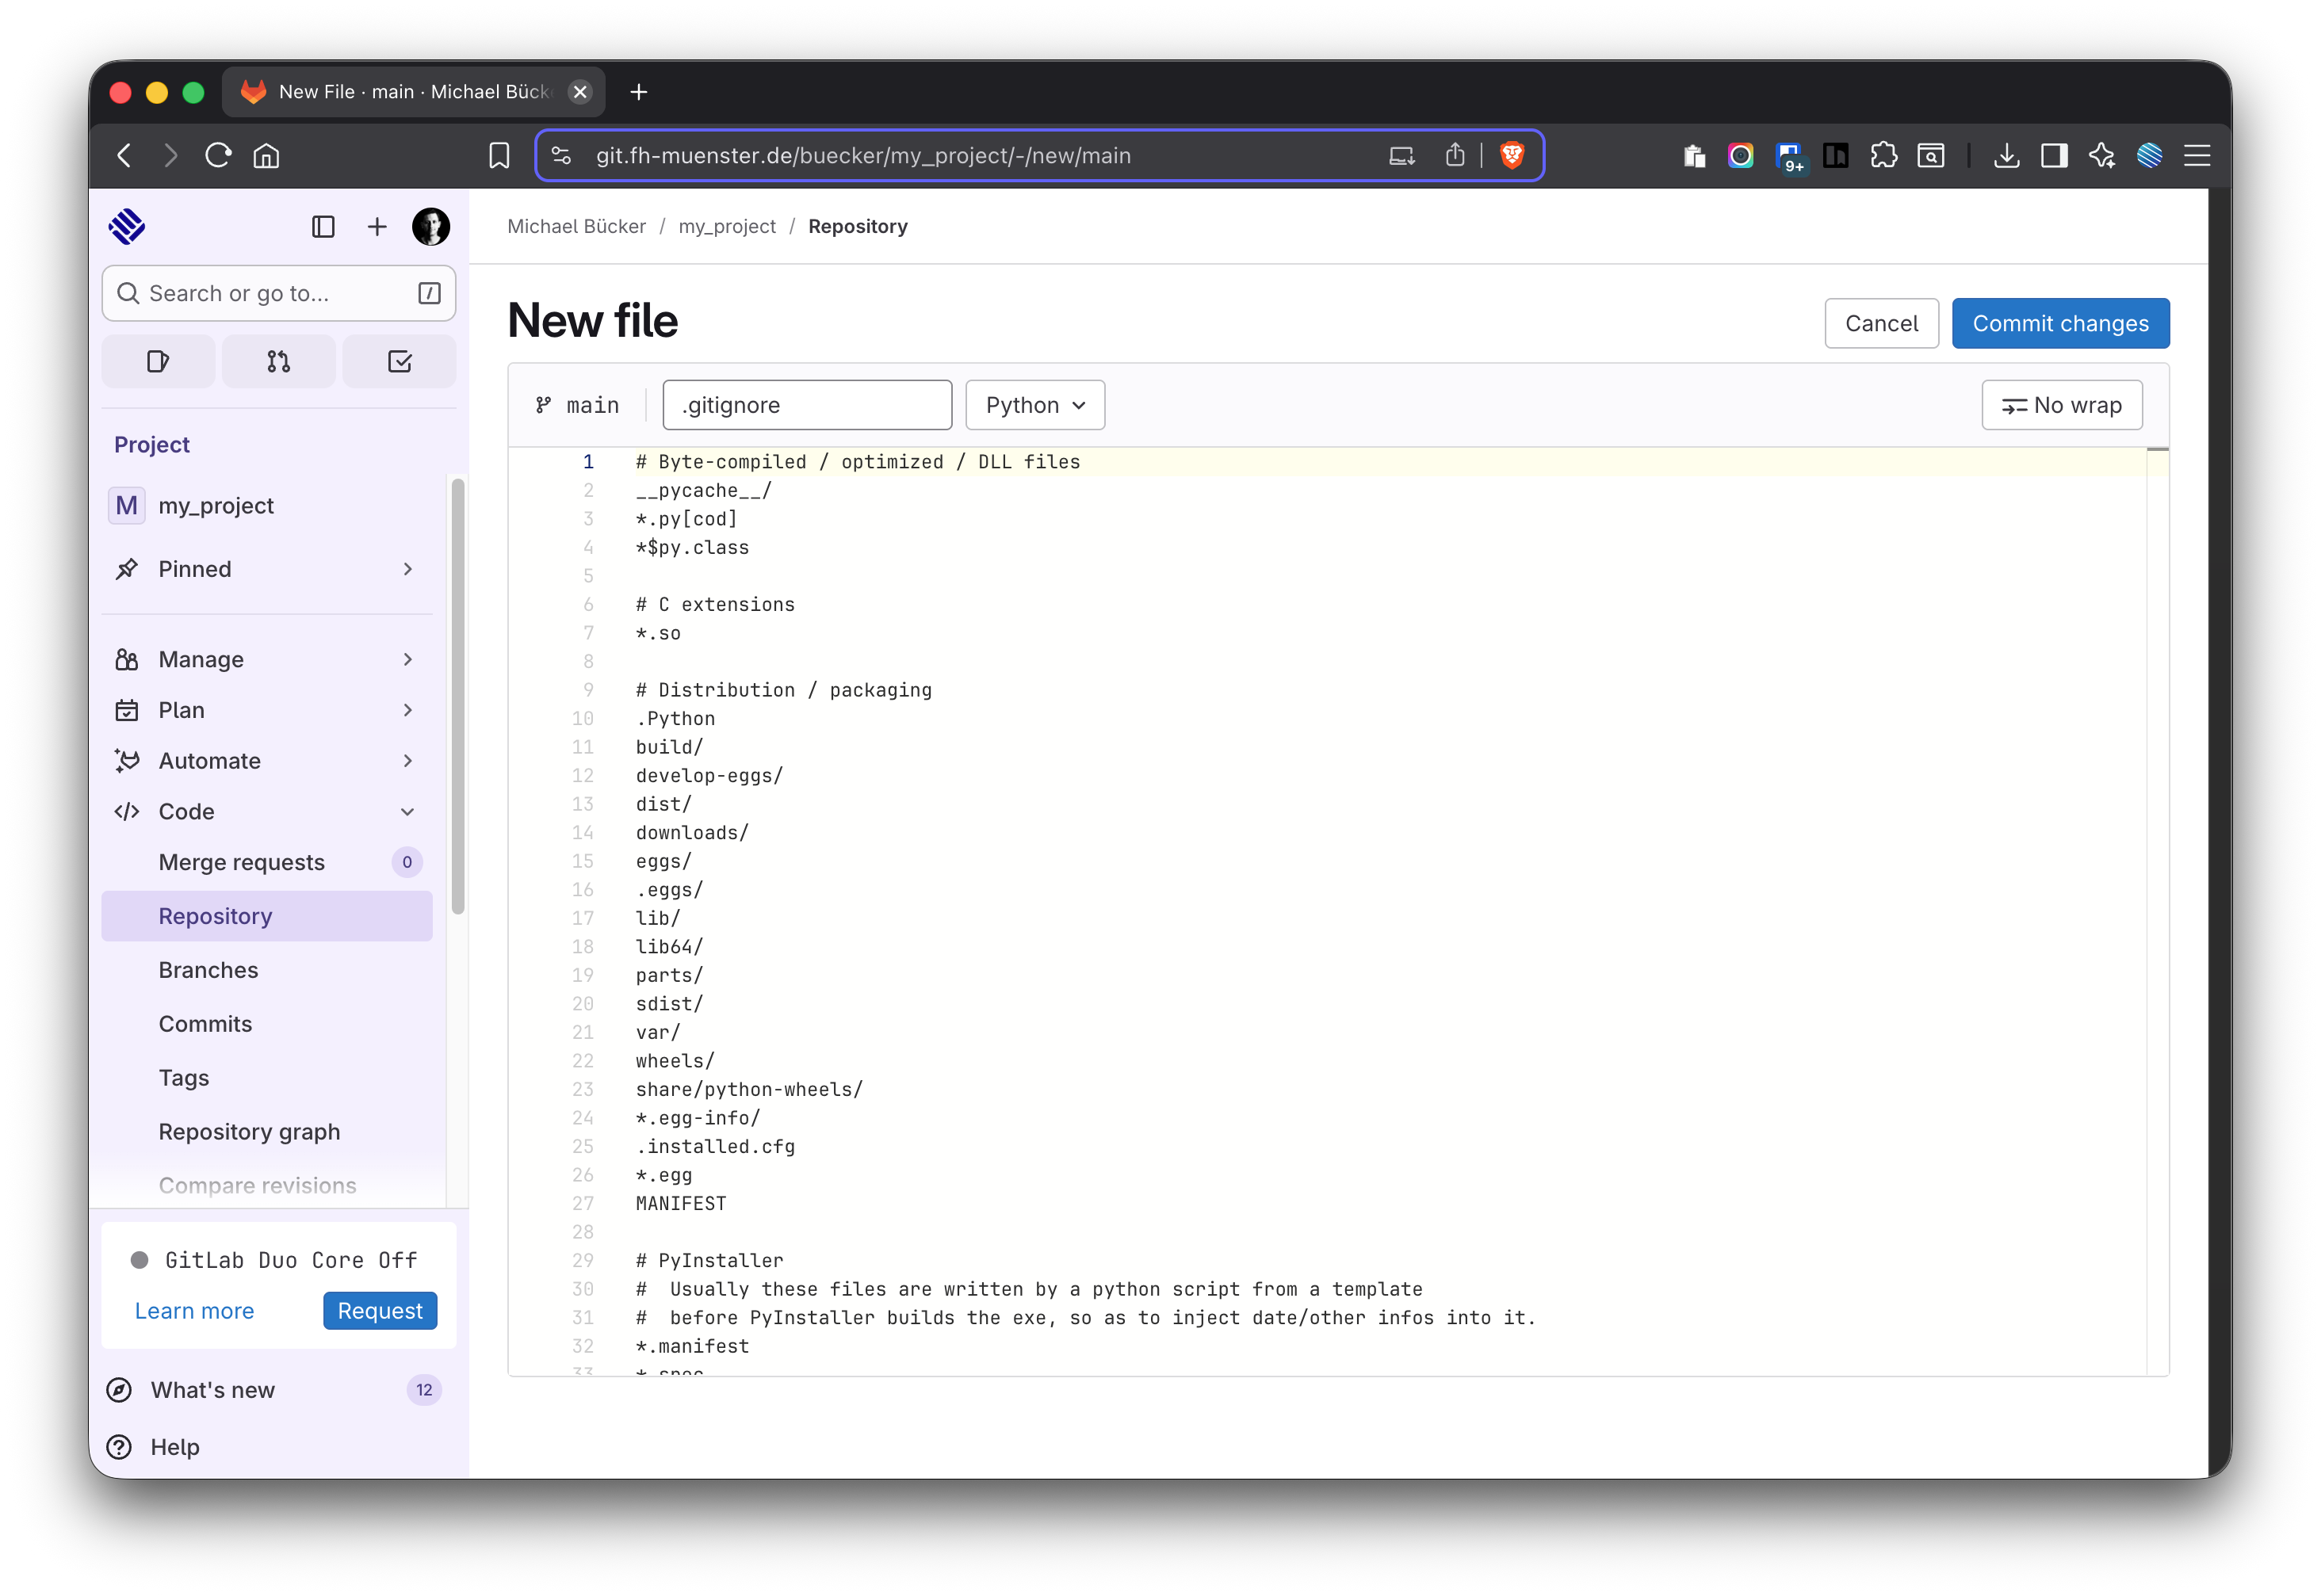
How to create a .gitignore file for your project
In your GitLab project, create a new file (Figure 9).
Name it .gitignore and select “Python” in the template dropdown, once it appears after typing in the file name (Figure 10) or add the following content:
.gitignore
# Byte-compiled / optimized / DLL files__pycache__/*.py[cod]*$py.class# C extensions*.so# Distribution / packaging.Pythonbuild/develop-eggs/dist/downloads/eggs/.eggs/lib/lib64/parts/sdist/var/wheels/share/python-wheels/*.egg-info/.installed.cfg*.eggMANIFEST# PyInstaller# Usually these files are written by a python script from a template# before PyInstaller builds the exe, so as to inject date/other infos into it.*.manifest*.spec# Installer logspip-log.txtpip-delete-this-directory.txt# Unit test / coverage reportshtmlcov/.tox/.nox/.coverage.coverage.*.cachenosetests.xmlcoverage.xml*.cover.hypothesis/.pytest_cache/# Translations*.mo*.pot# Django stuff:*.loglocal_settings.pydb.sqlite3# Flask stuff:instance/.webassets-cache# Scrapy stuff:.scrapy# Sphinx documentationdocs/_build/# PyBuildertarget/# Jupyter Notebook.ipynb_checkpoints# IPythonprofile_default/ipython_config.py# pyenv.python-version# celery beat schedule filecelerybeat-schedule# SageMath parsed files*.sage.py# Environments.env.venvenv/venv/ENV/env.bak/venv.bak/# Spyder project settings.spyderproject.spyproject# Rope project settings.ropeproject# mkdocs documentation/site# mypy.mypy_cache/.dmypy.jsondmypy.json# Pyre type checker.pyre/# pytype static type analyzer
Click “Commit changes” twice.
Figure 9: Create the .gitignore file in GitLab before cloning to JupyterHub
Figure 10: Create the .gitignore file in GitLab before cloning to JupyterHub
ImportantCreate only one repository per project team
One teammate (repo Owner) creates the private GitLab repo (with README + Python .gitignore) and invites others as Developer.
Everyone else clones that single repo into a project folder in JupyterHub (not the home directory), following Section 3.
You can perform the same Git workflow on GitHub. The steps (create a repo, clone, commit, push, invite collaborators) are conceptually identical. When you use GitLab for coursework you can simply use your FH Münster credentials and won’t have to create a separate GitHub account.
3 Integrating a GitLab Repository in JupyterHub
To bring a fresh GitLab project into JupyterHub:
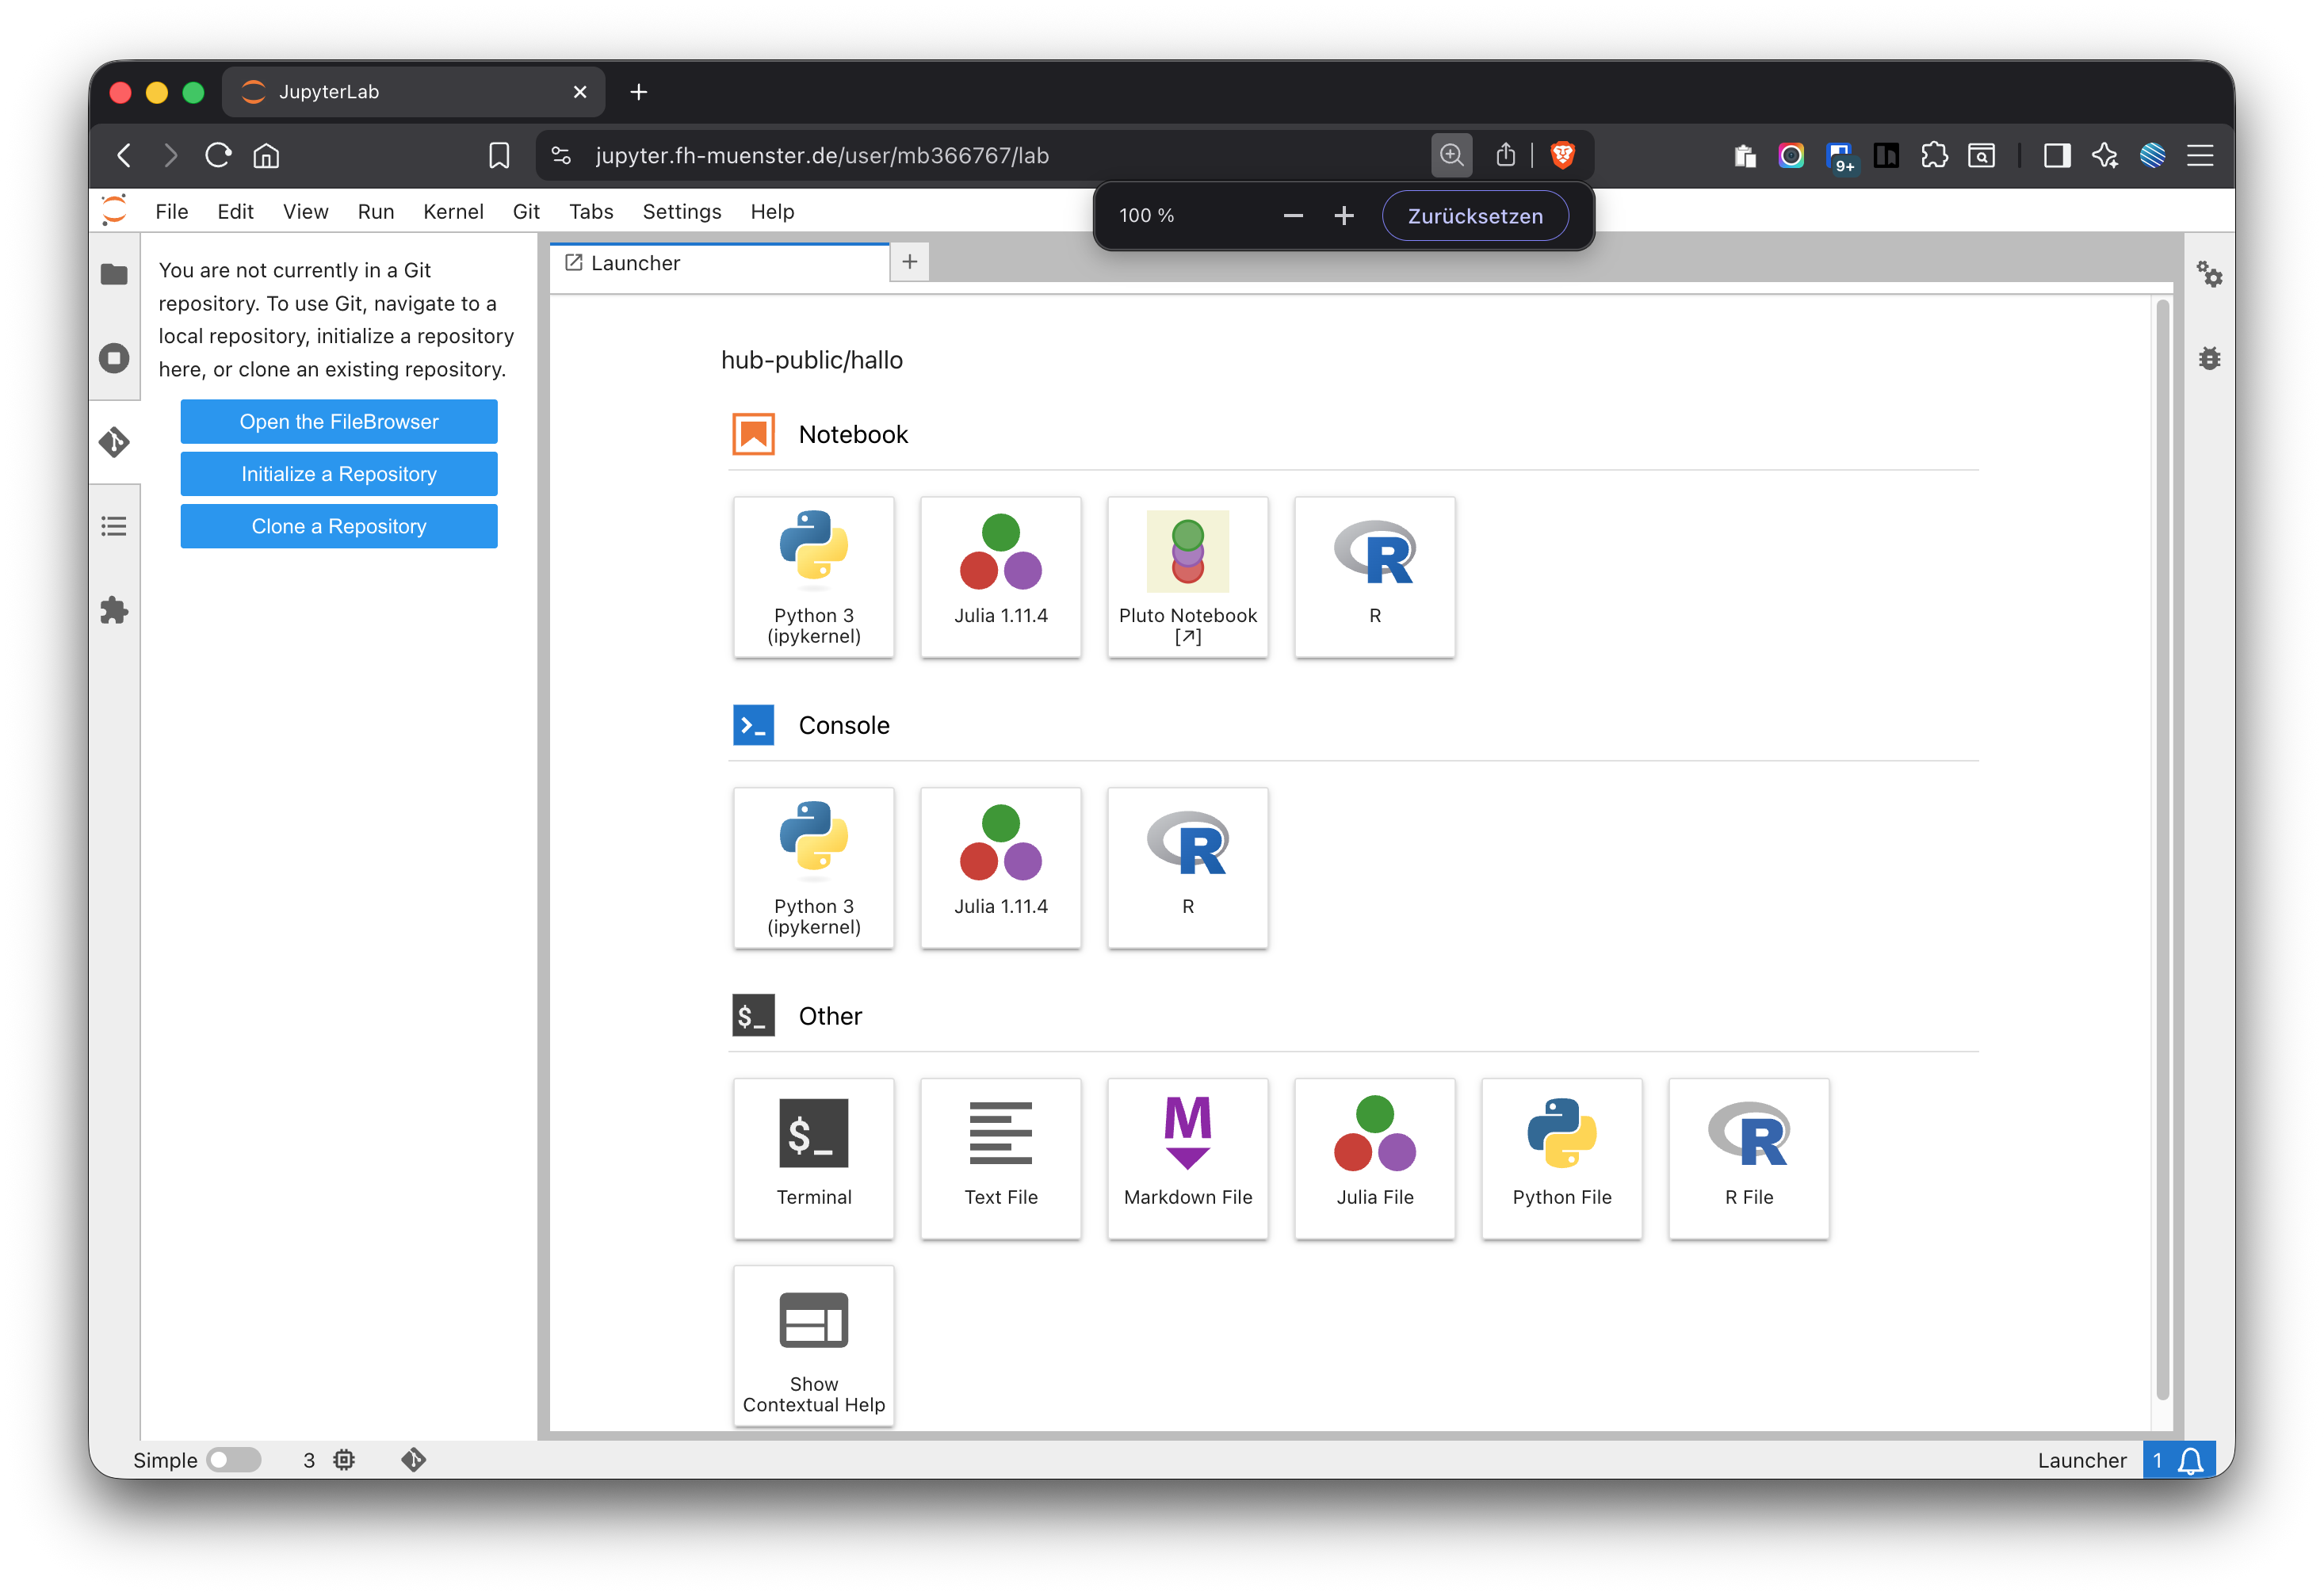
In Jupyterhub, move to your home directory (make sure you are not in the folder hub-public). Then click on the Git symbol in the sidebar to open the Git panel (Figure 11)
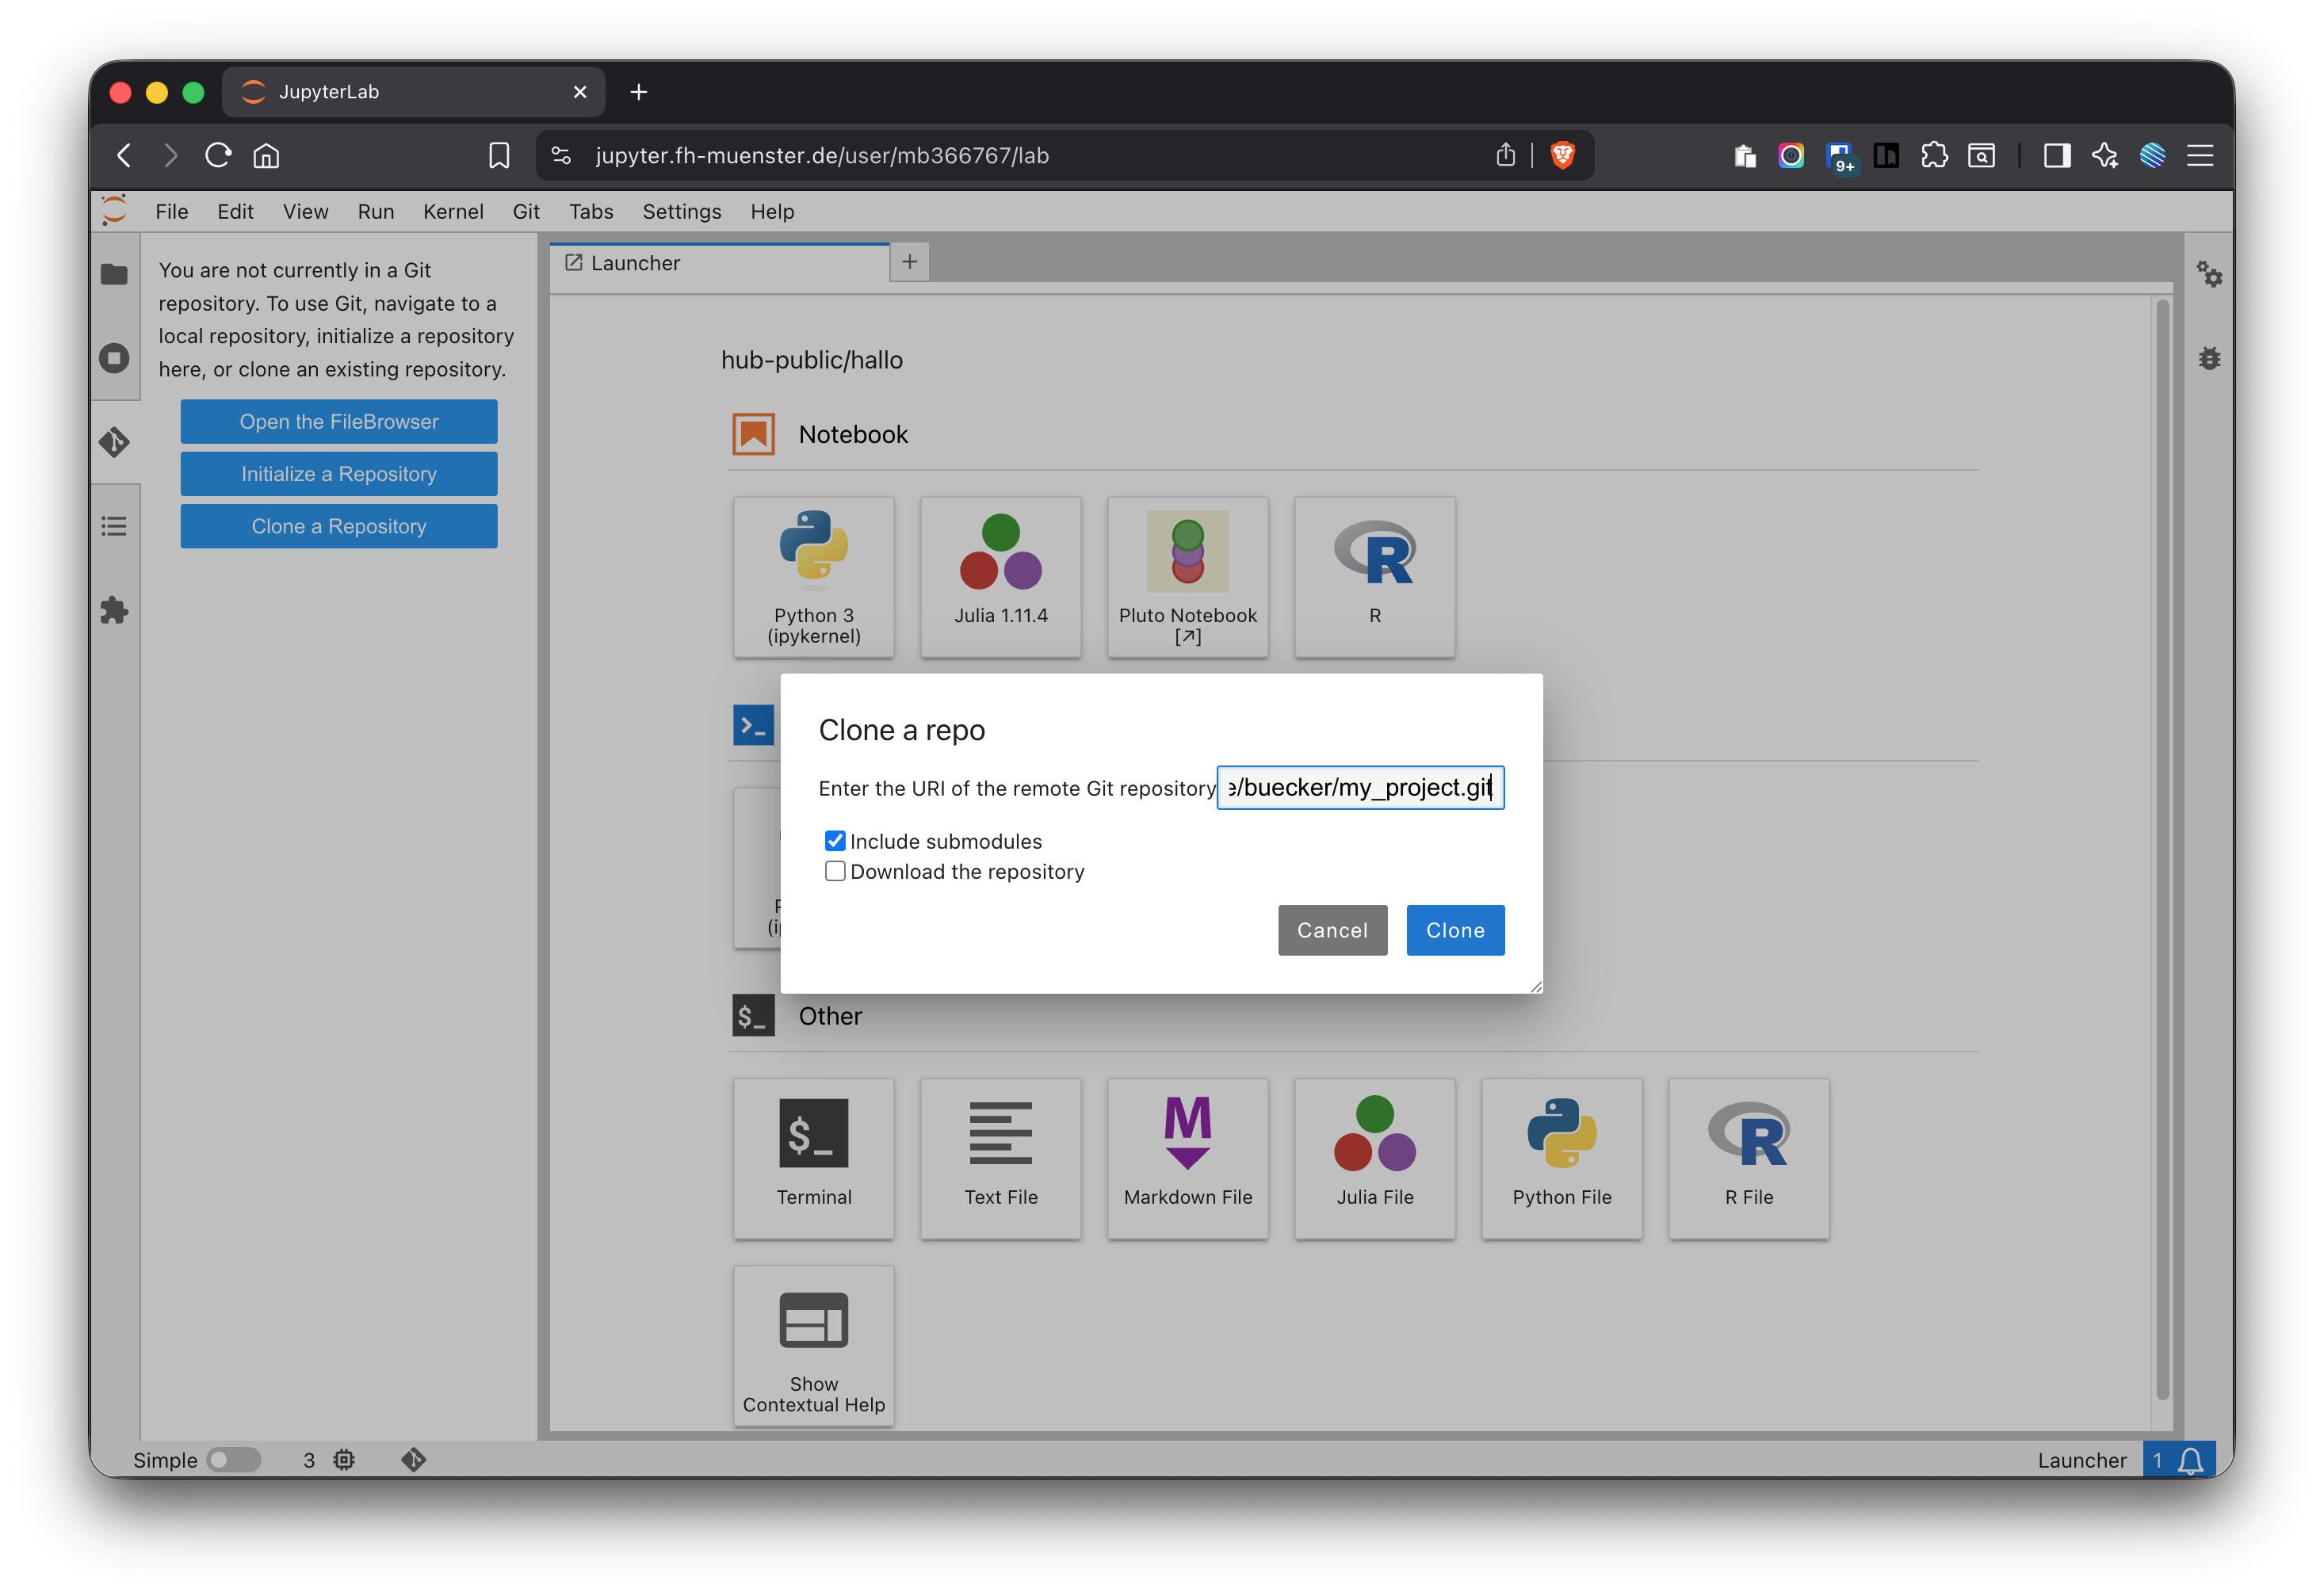
Click on “Clone a repository” and enter your repository’s HTTP URL https://git.fh-muenster.de/.../my_project.git (Figure 12)
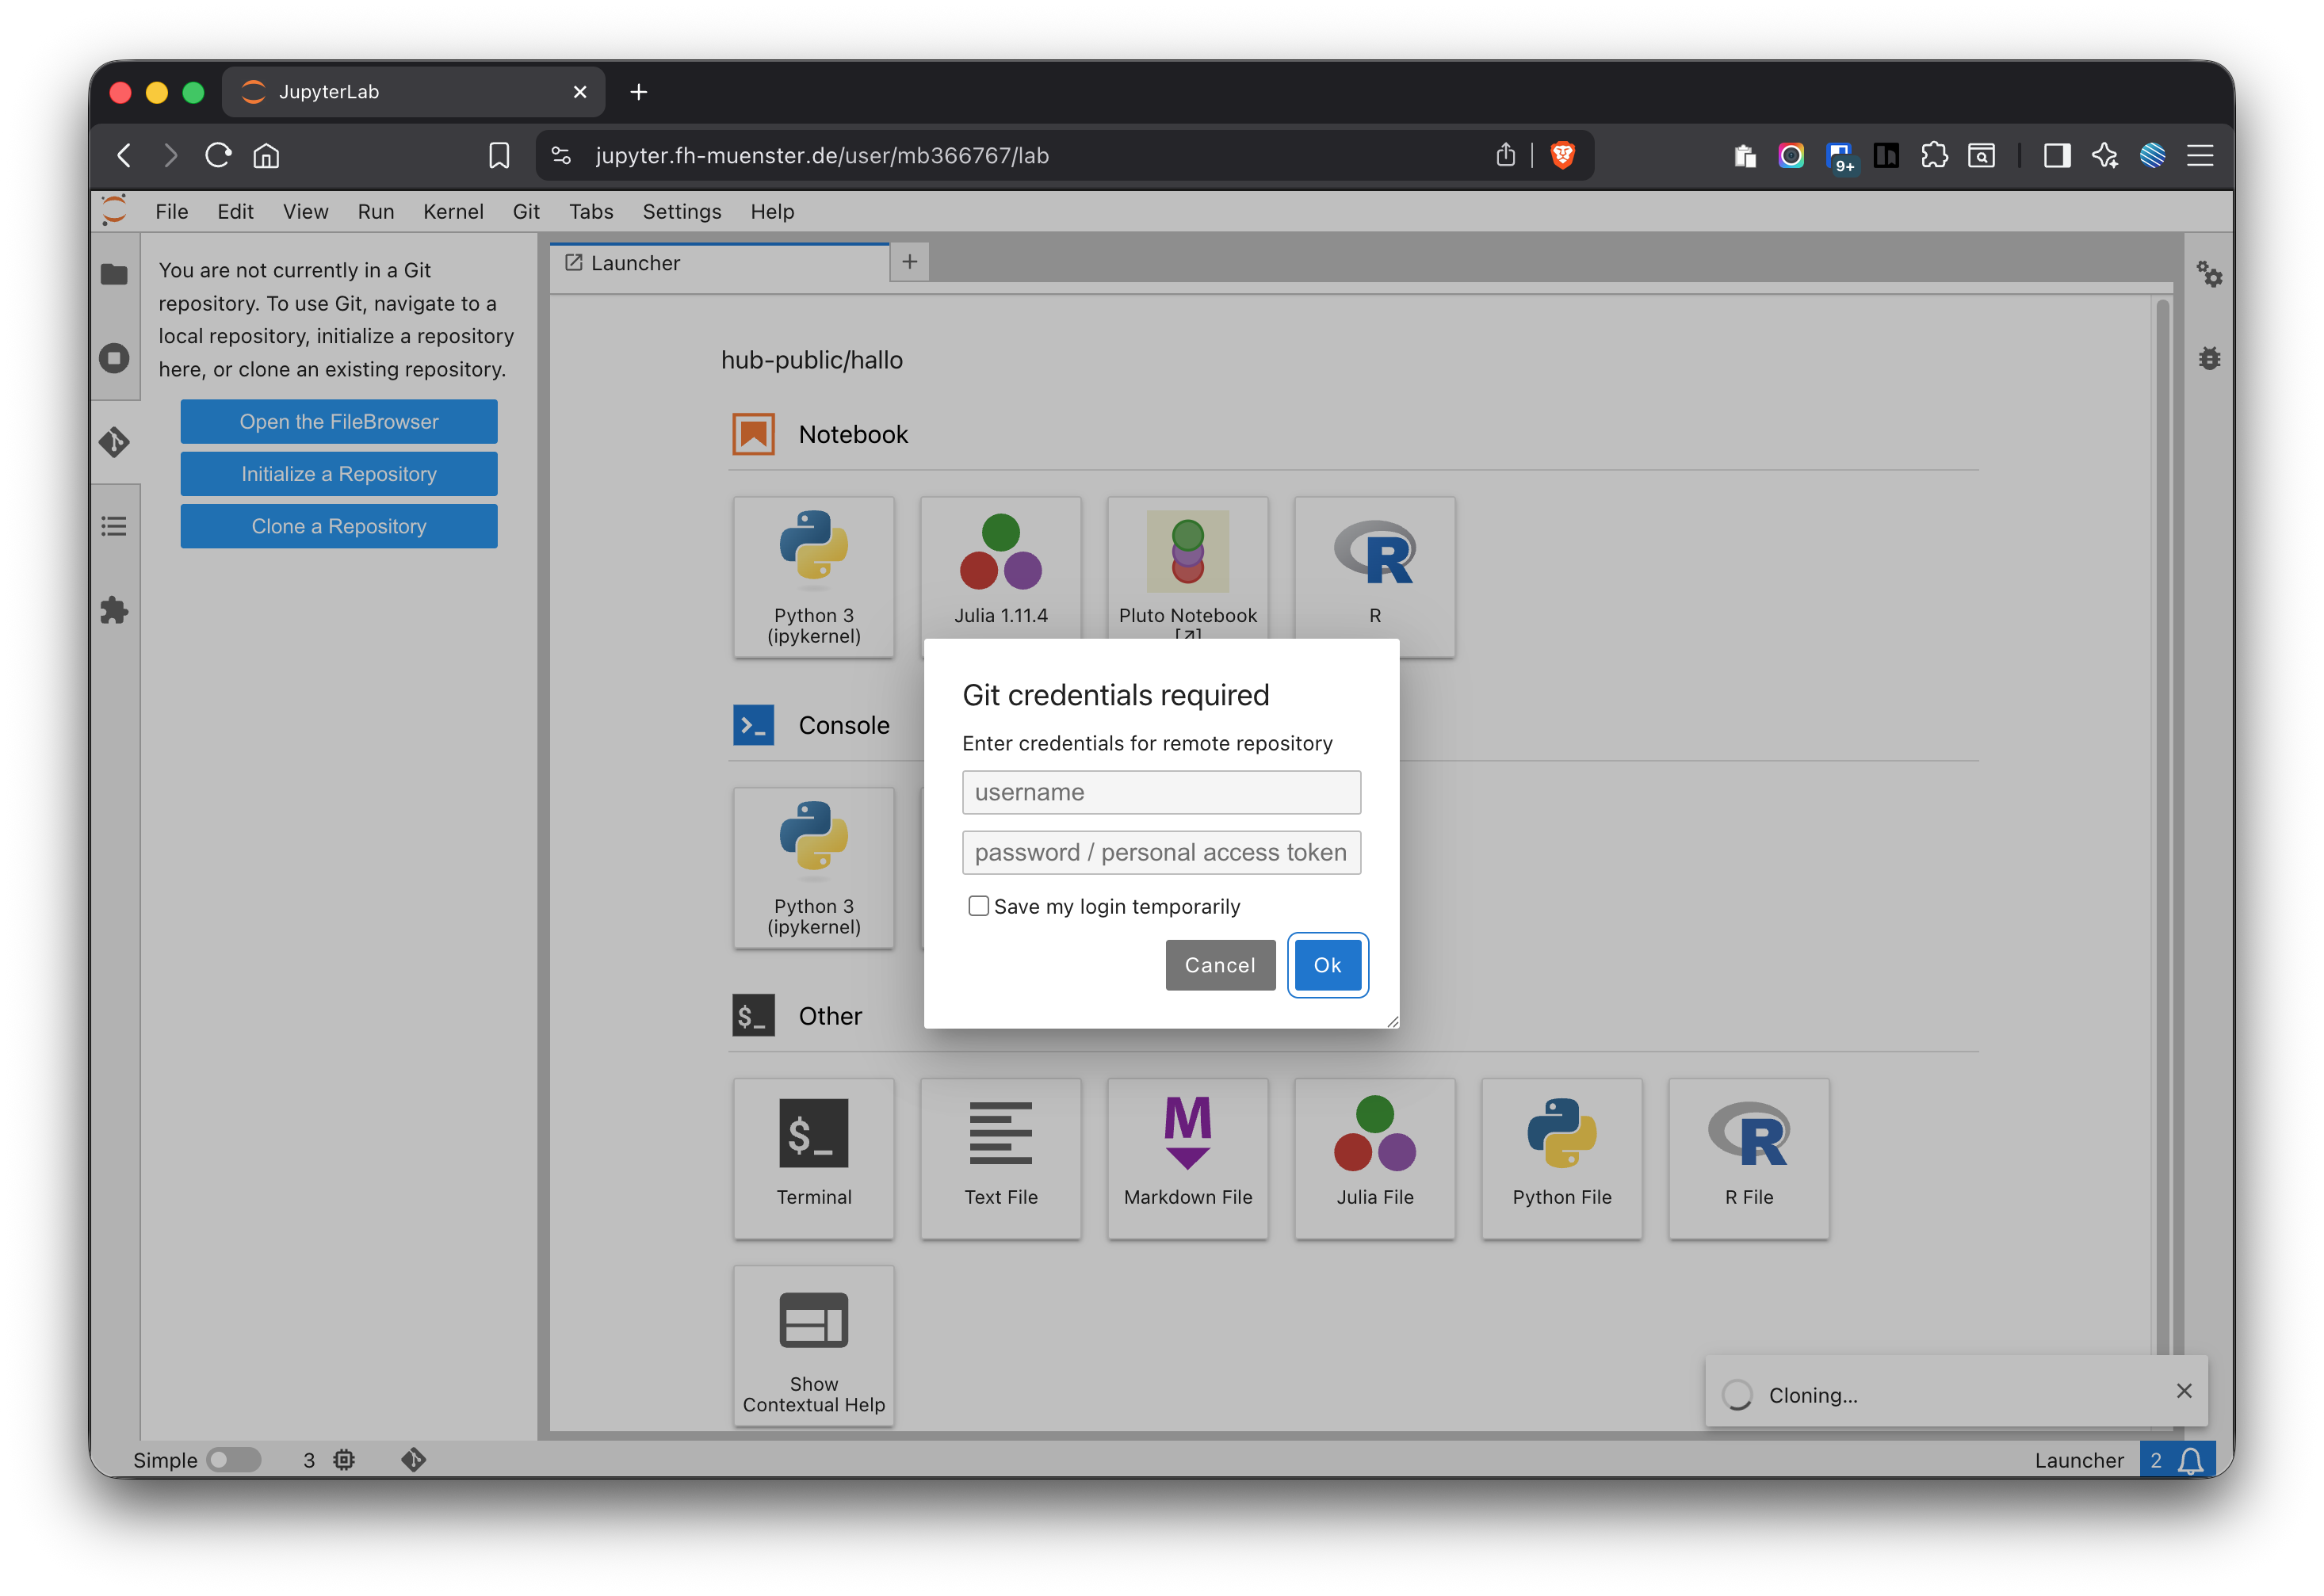
Provide your GitLab (FH) credentials and store them temporarily (Figure 13)
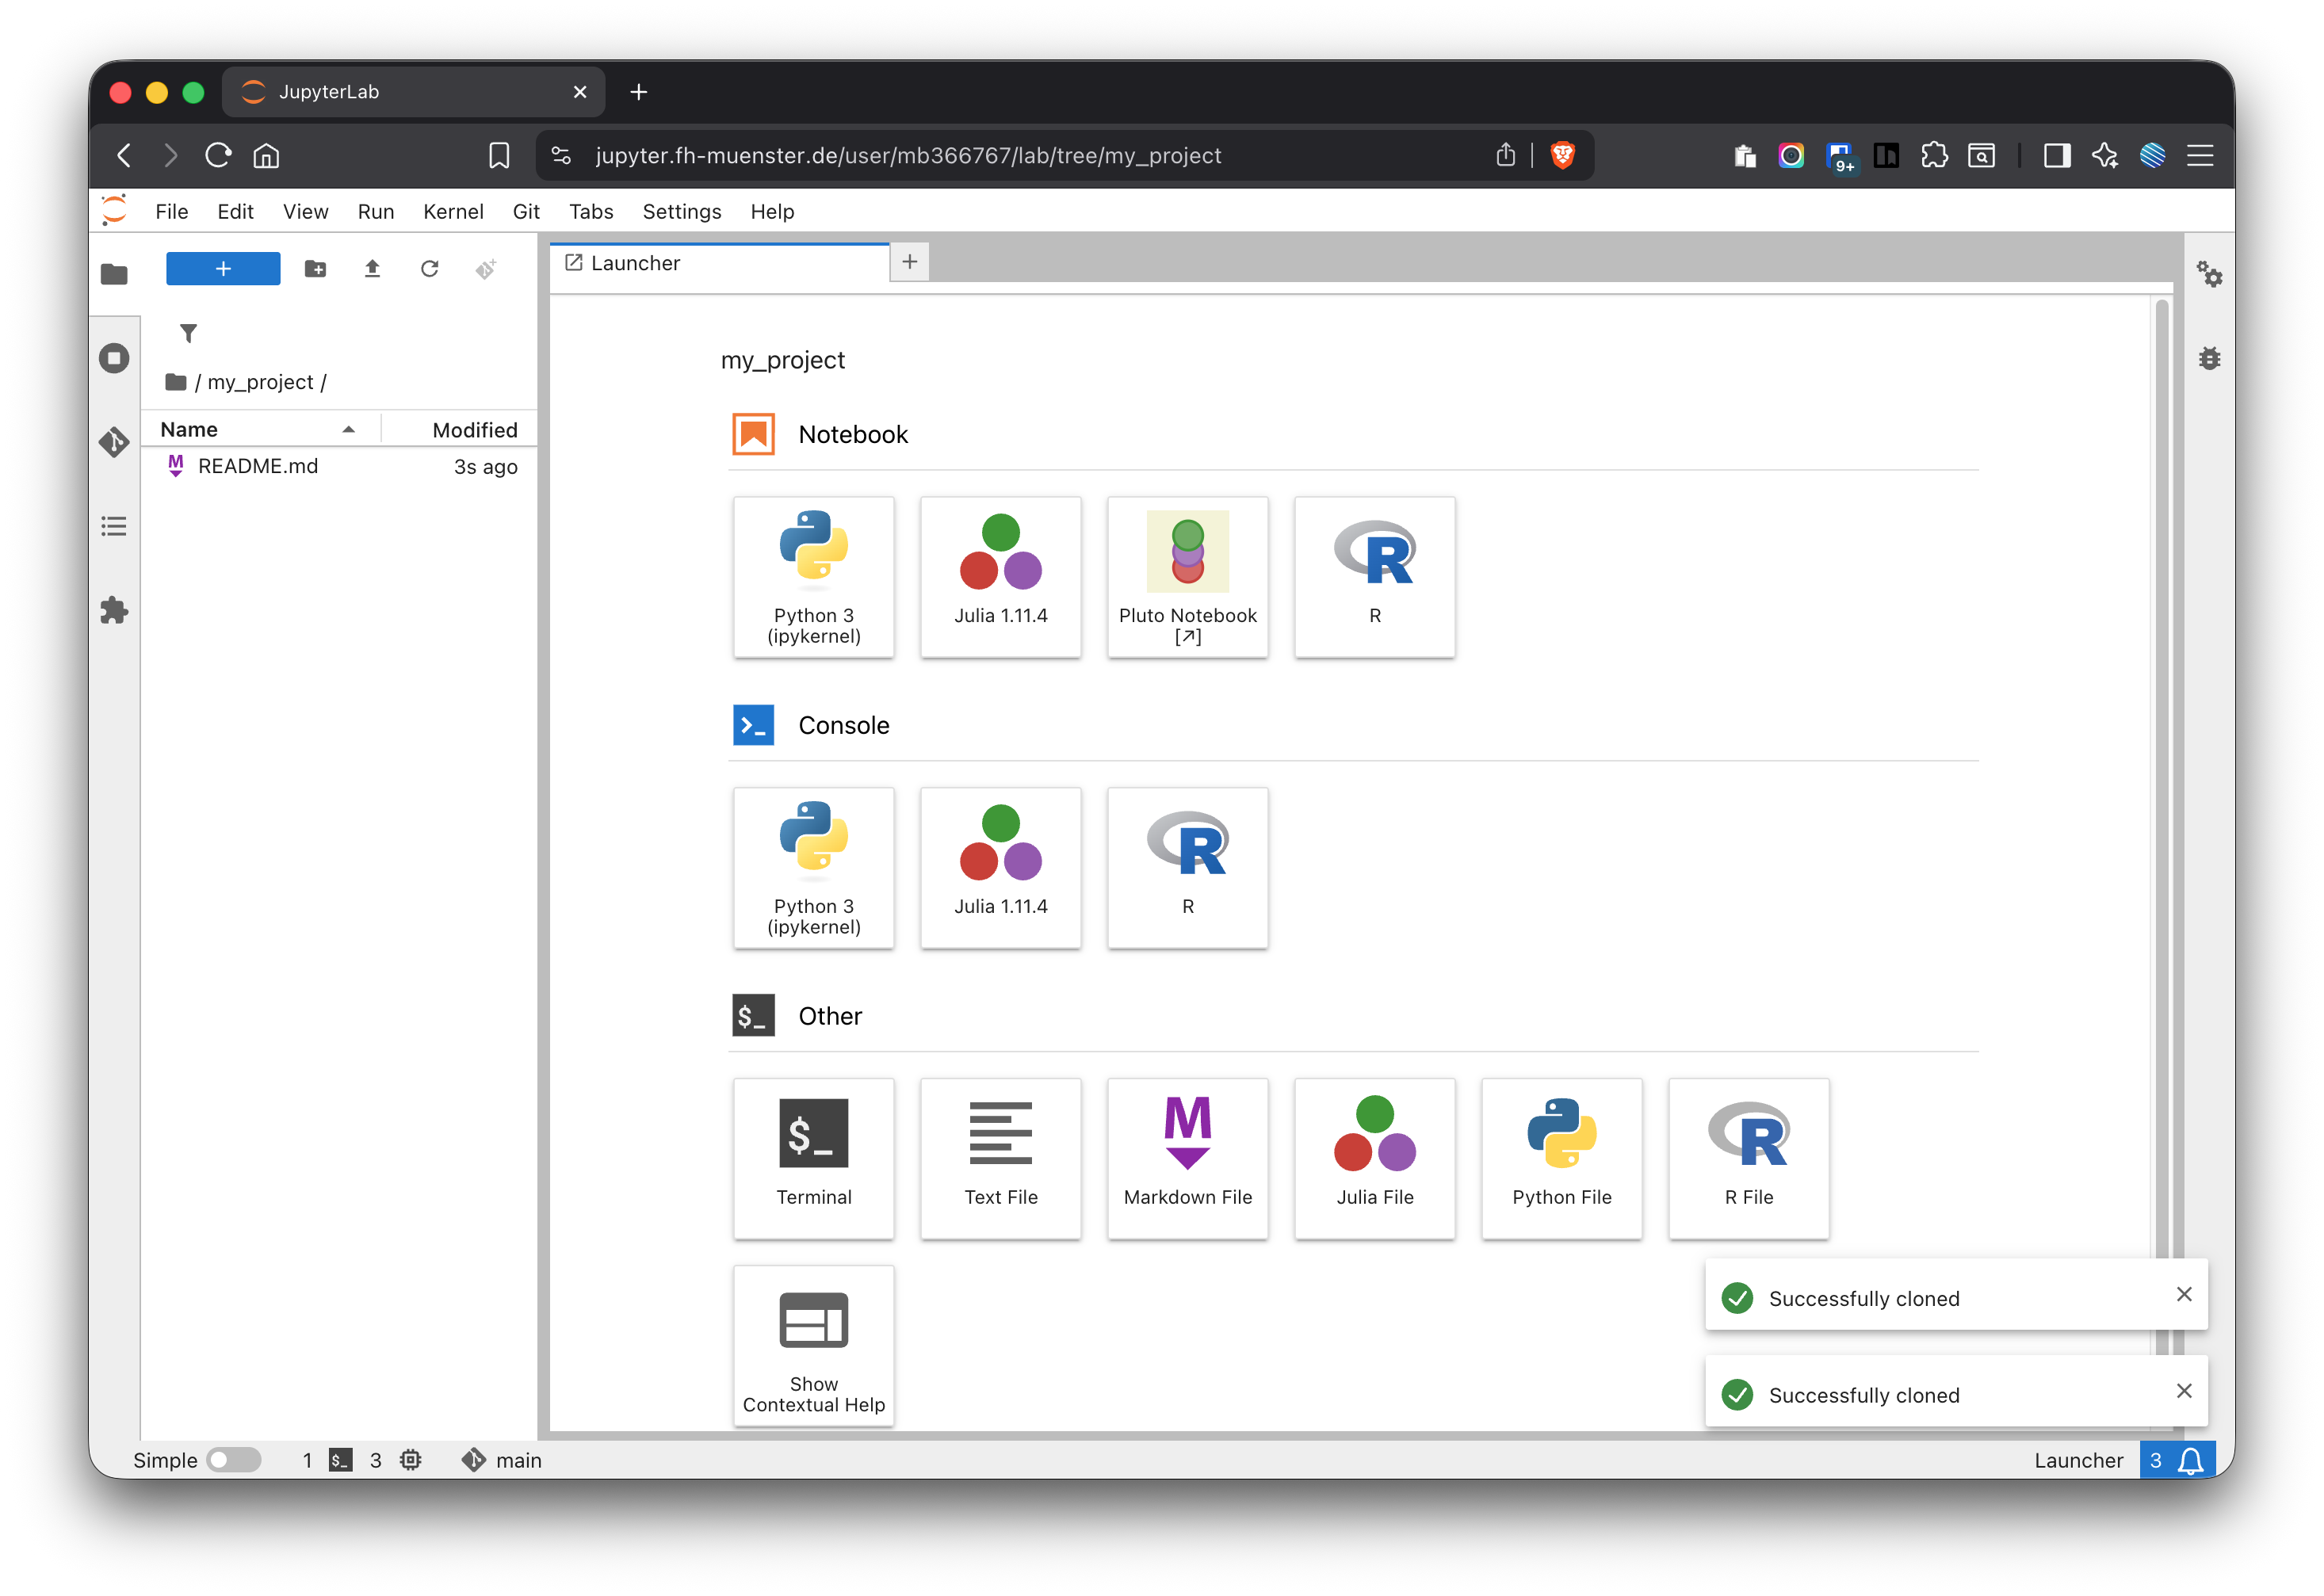
When the repository is cloned, it is shown in the folder overview (Figure 14). The repo will be cloned into a new folder with the name of the repo within your home directory.
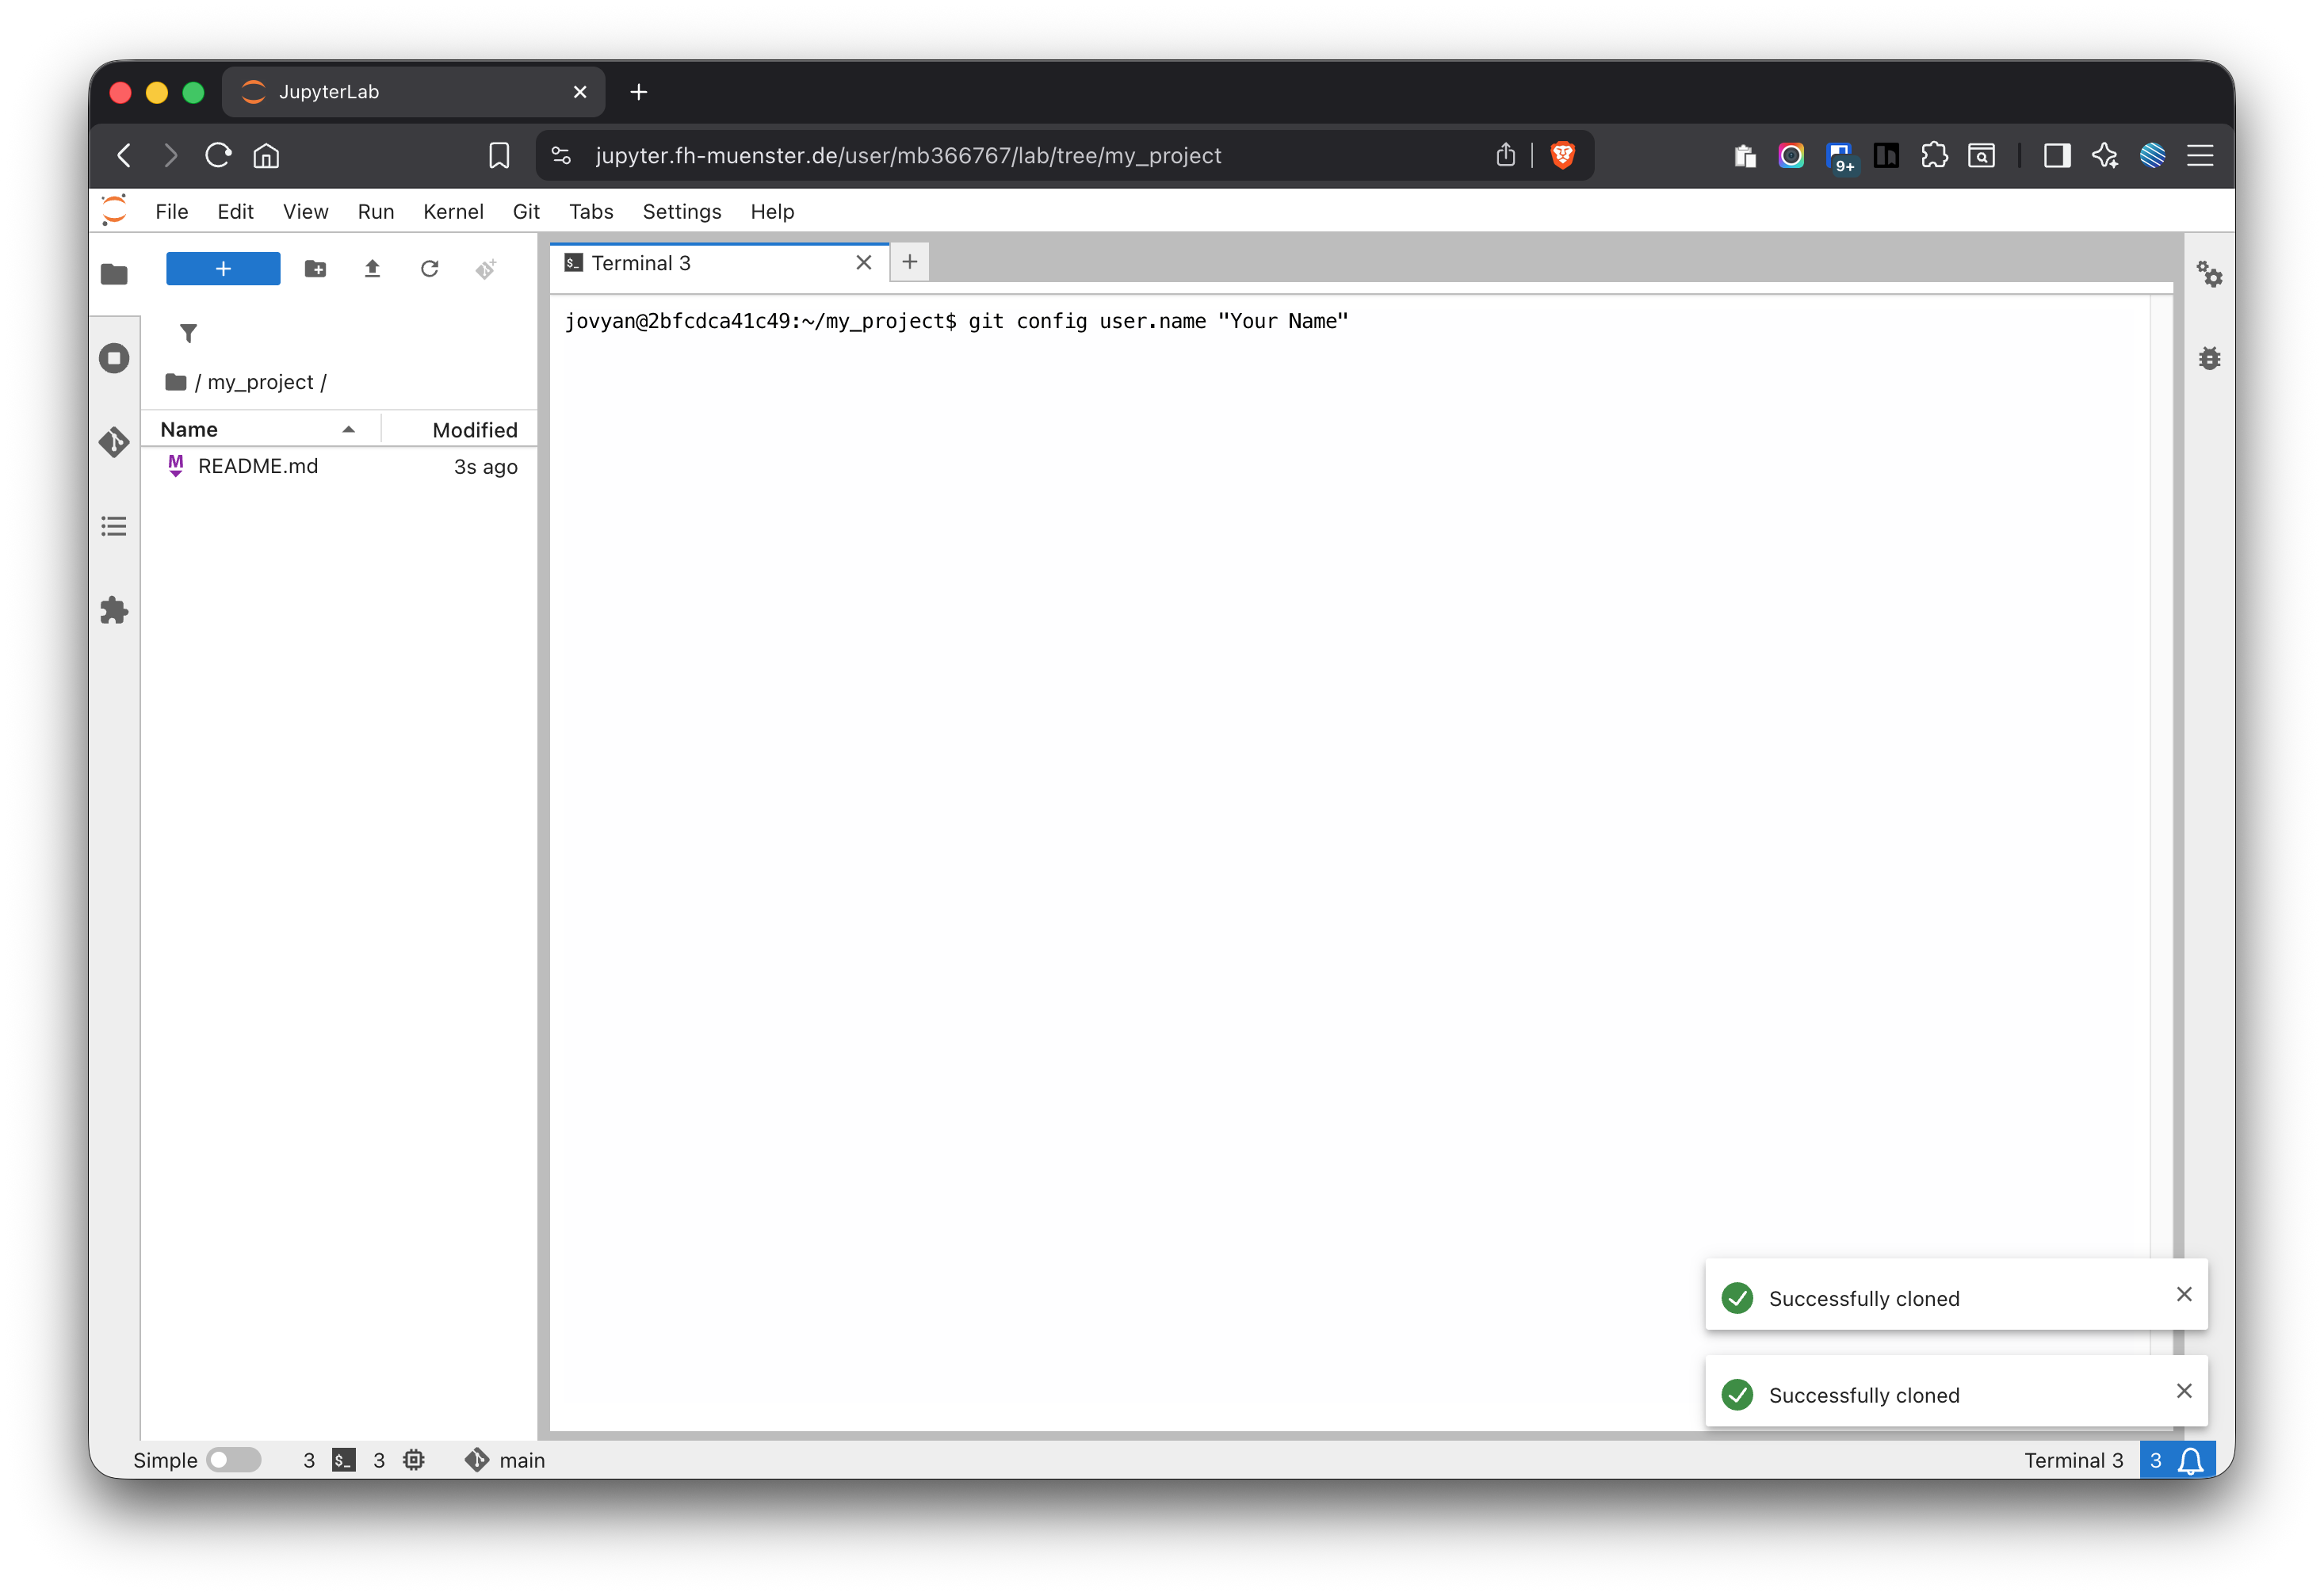
(Once per project) Set your Git identity on JupyterHub if not already set
Figure 11: The Git panel in JupyterHub before cloning a repository
Figure 12: Cloning a repository with JupyterHub
Figure 13: Enter your credentials to clone the repository with JupyterHub
Figure 14: The repository has been successfully cloned
Figure 15: Open a terminal in JupyterHub
Figure 16: Enter a name and email address for Git
3.1 Putting an Existing JupyterHub Project Under Git
If you already have a project folder and want to put it under version control (not recommended, rather start with an empty project cloned from GitLab):
Go to the project folder (not your home folder):
Initialize Git by clicking on the respective button in the Git sidebar (Figure 11):
Create a new empty project in GitLab.
Connect your local repo to the remote and push with the respective HTTPS URL.
4 Using GitLab in JupyterHub
4.1 Commit
A commit is a named snapshot of exactly the files you select. Commit early and often so your history tells a clear story and rollbacks stay small.
In JupyterHub (Git sidebar)
Make sure you are in your project folder (never your home directory).
Open the Git panel. The Unstaged list shows files changed since the last commit.
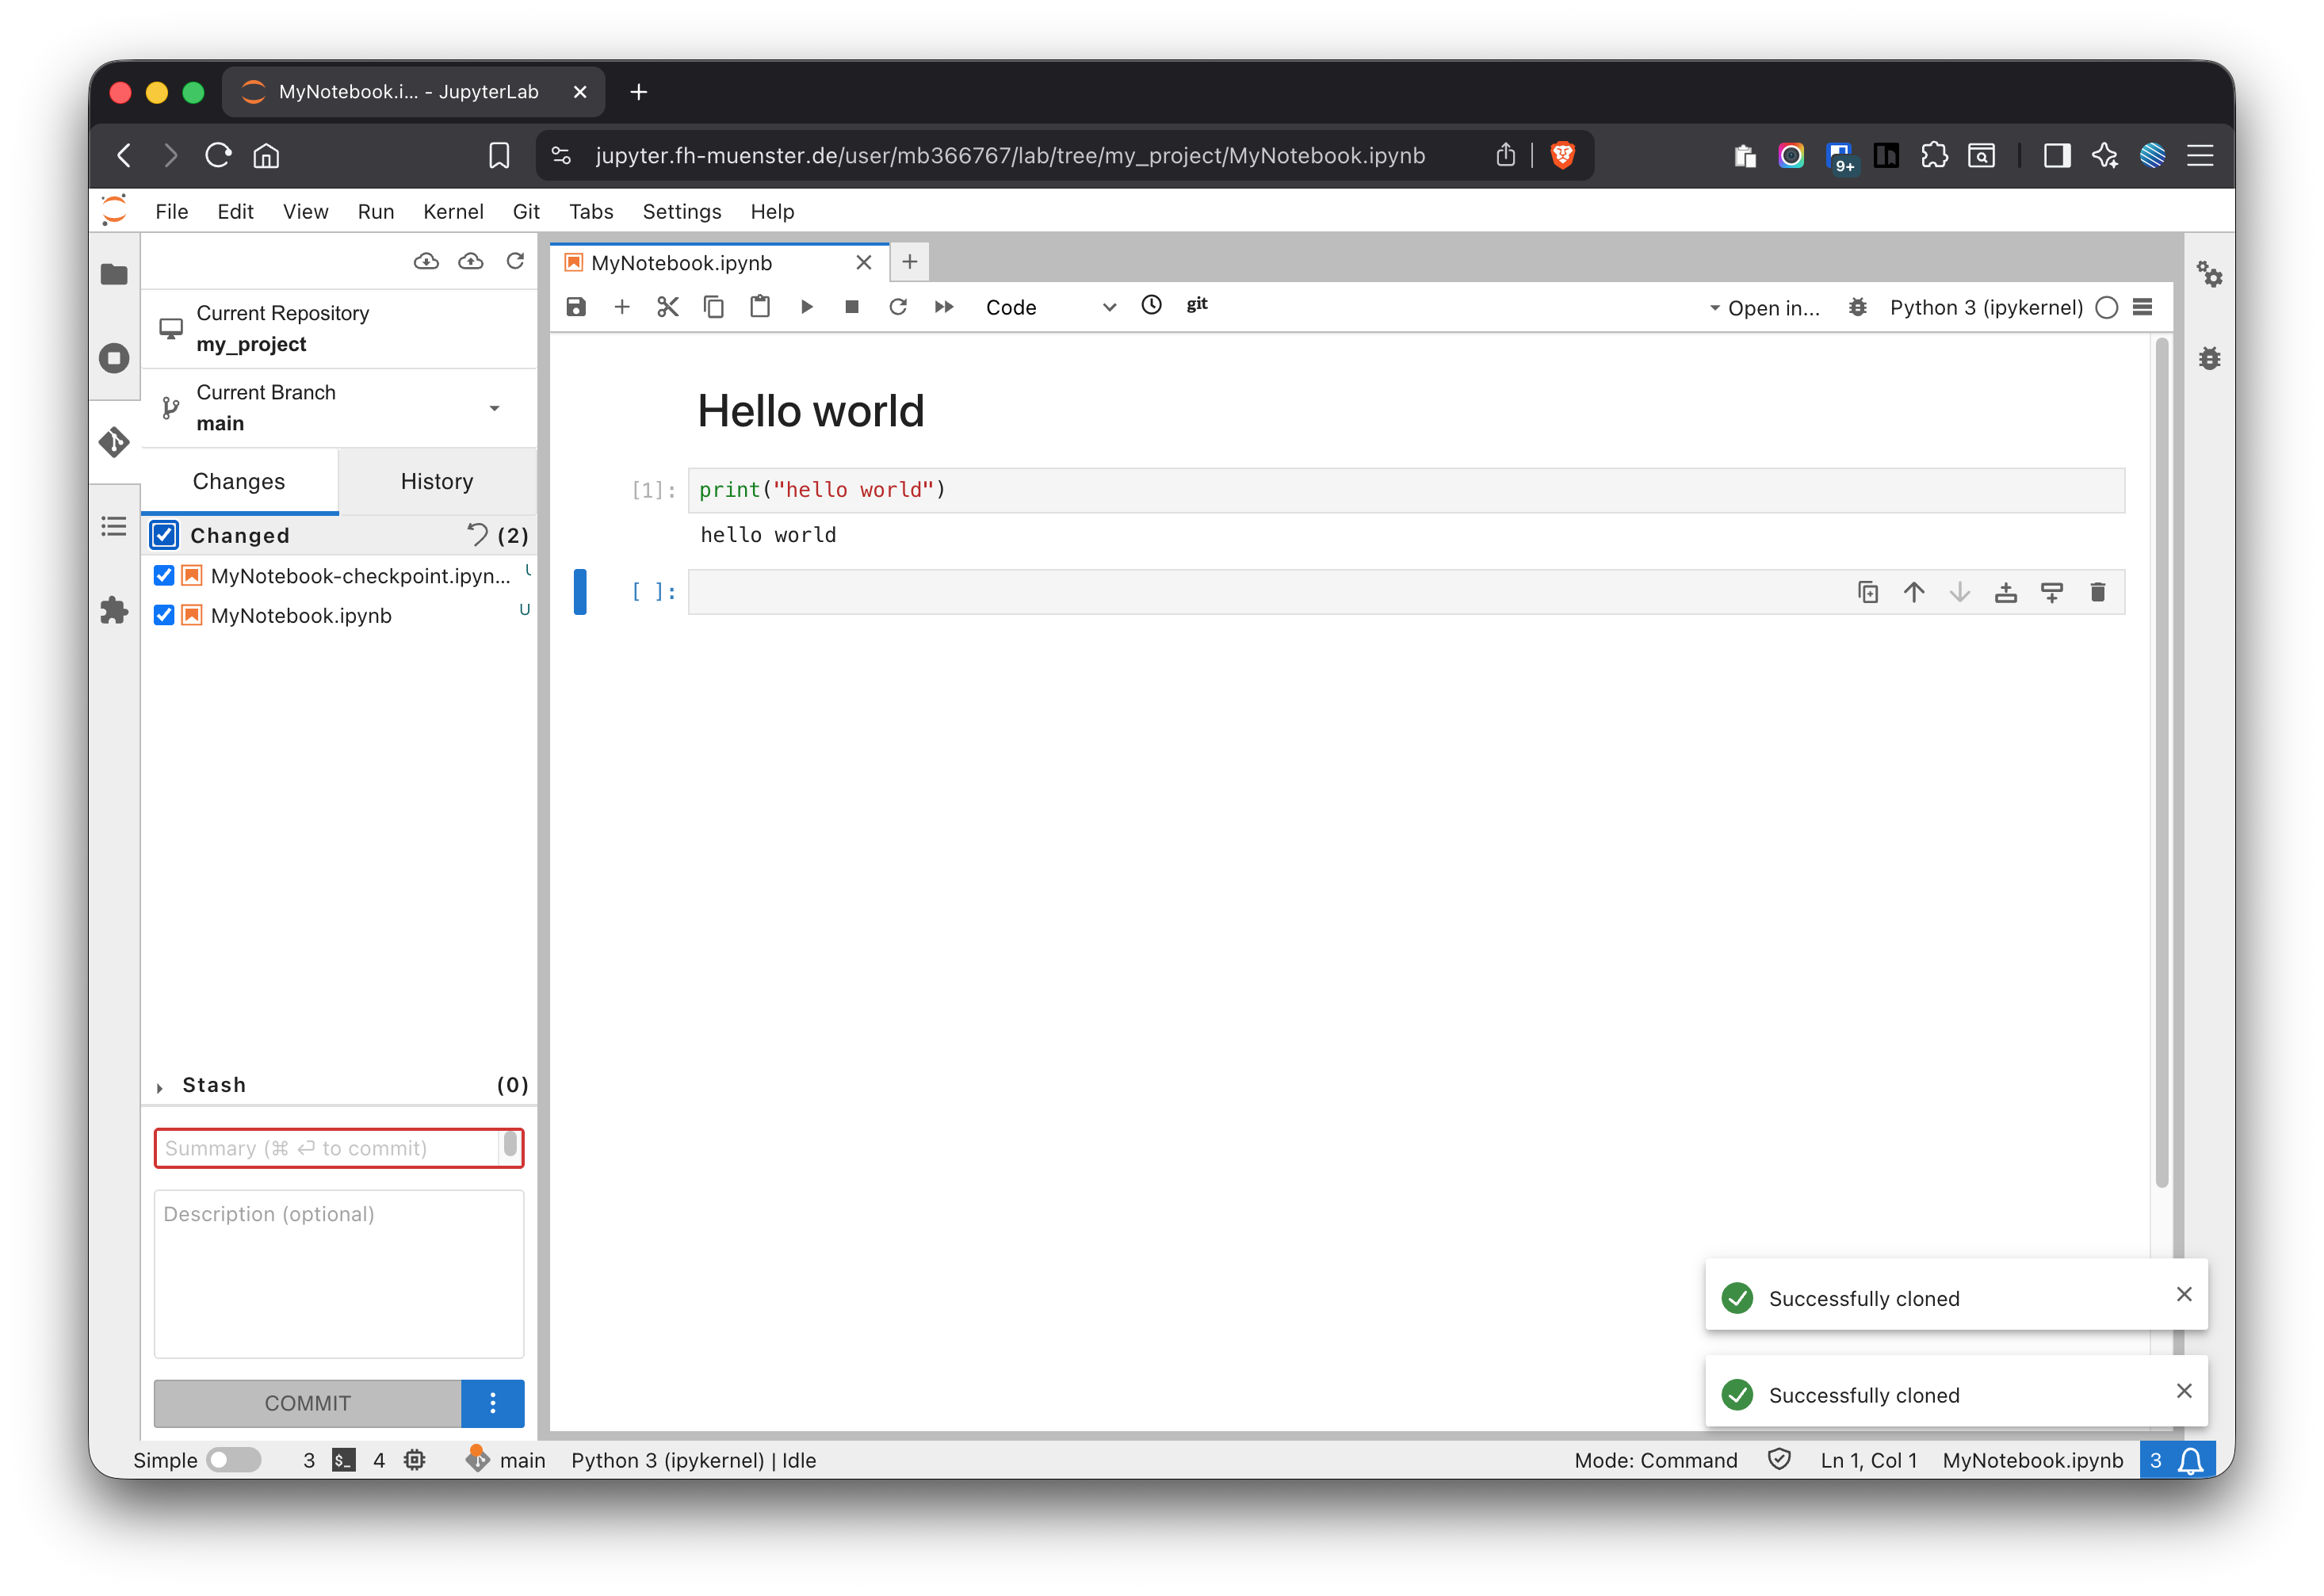
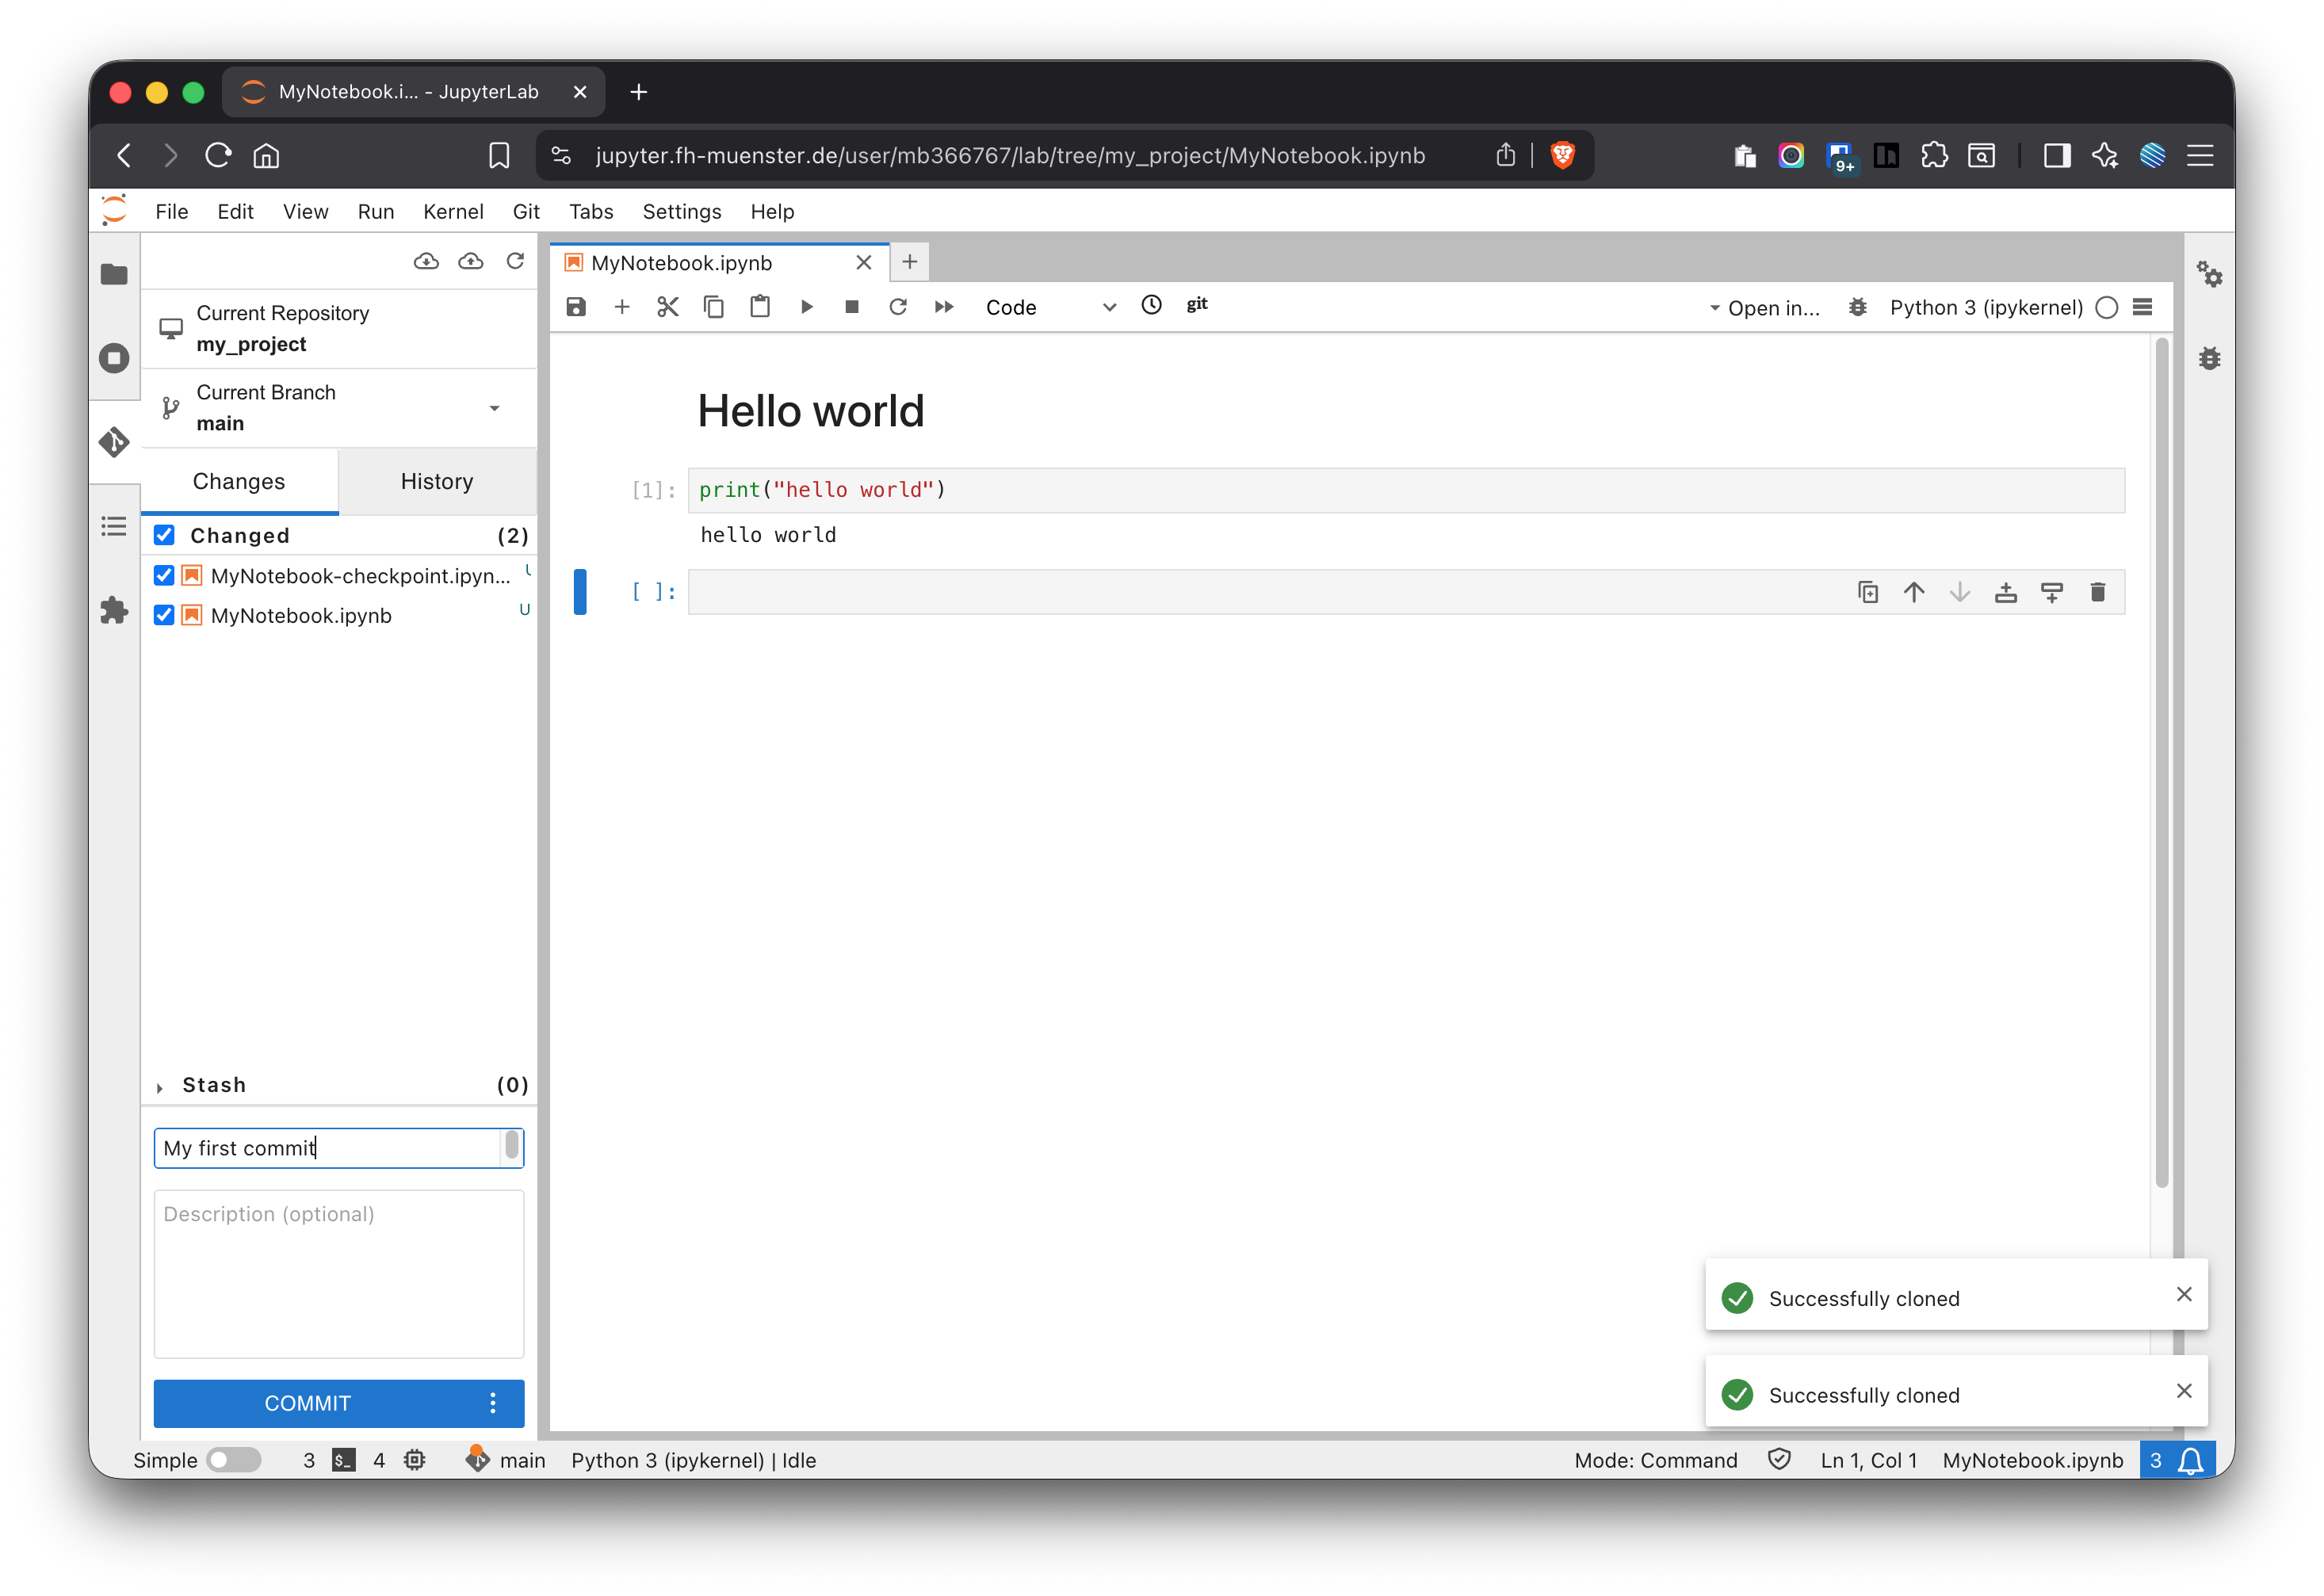
Move only the files you want to save into Staged (use the checkboxes, see Figure 17).
Write a short, action-oriented message (imperative mood works well, see Figure 18), e.g.
Add EDA notebook for outlier detection
Refactor loading utils; fix missing dtype
Click Commit. The snapshot is now part of your local history.
Figure 17: Select the files you want to commit
Figure 18: Enter a commit message
TipGood practice
Keep commits focused (one topic/change per commit).
Don’t stage transient or large files (check your .gitignore).
If you committed the wrong file, you can unstage before committing (UI: move back to Unstaged).
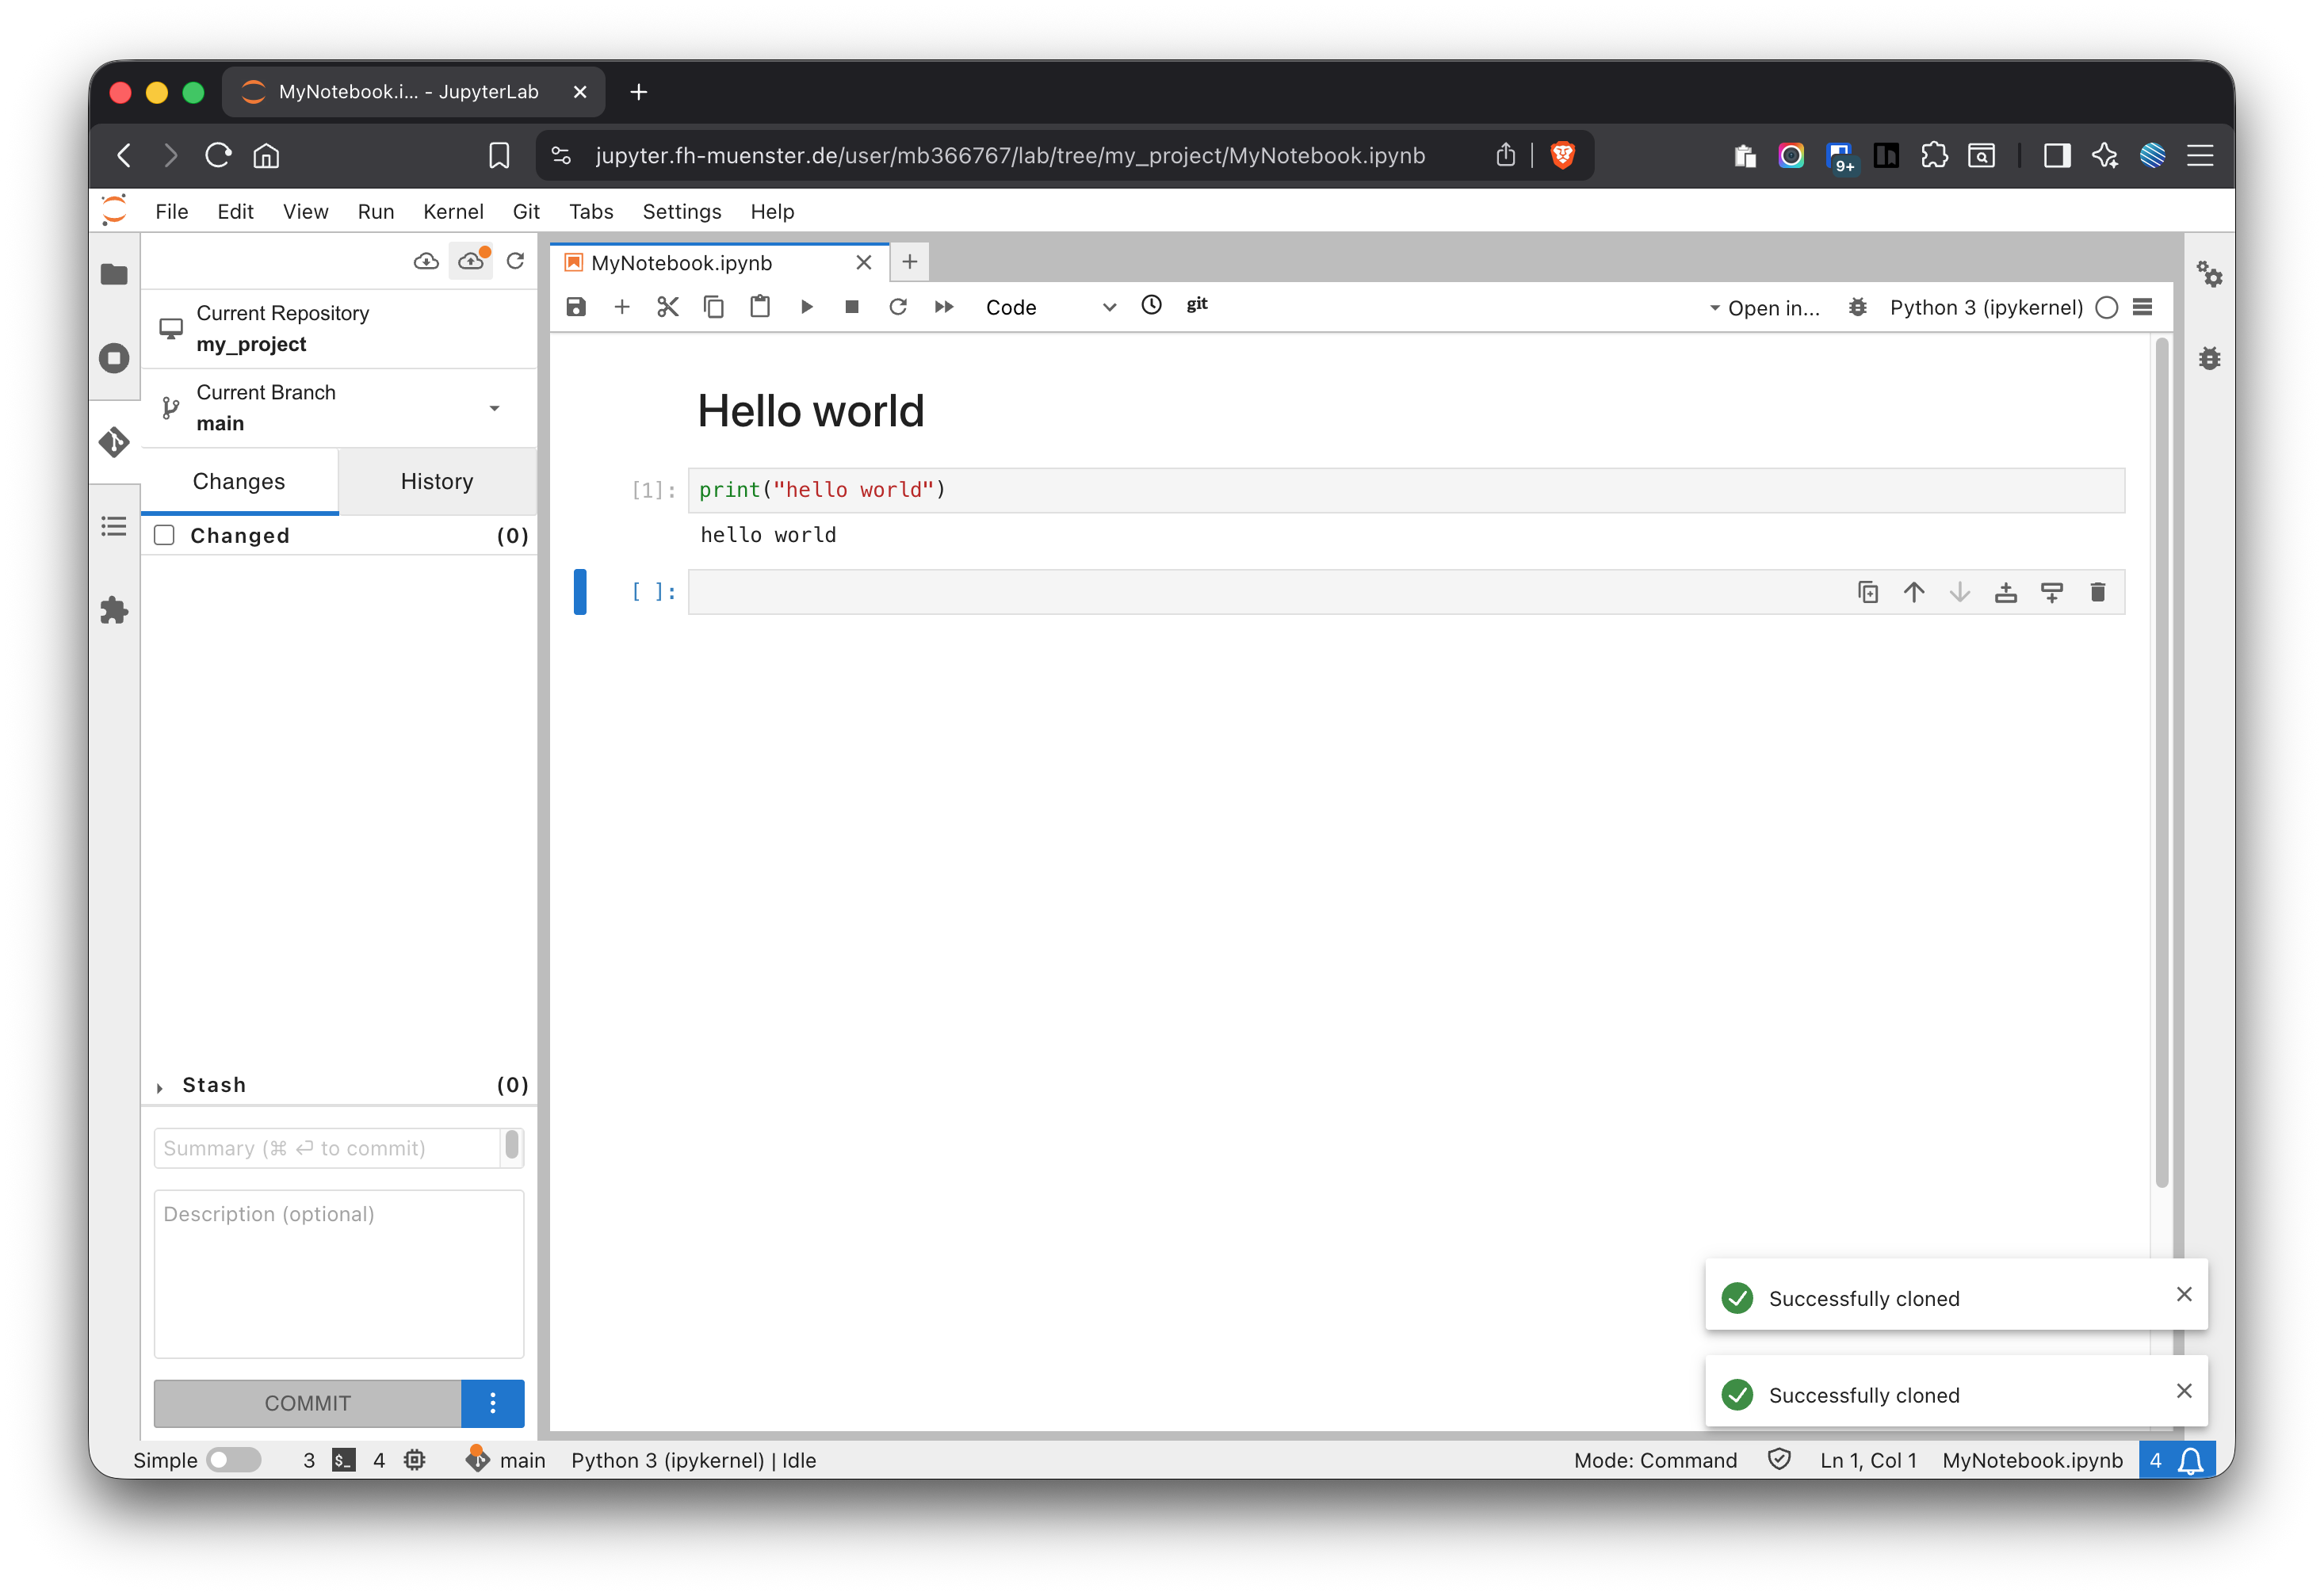
4.2 Push/Pull
Pull brings your teammates’ latest work from GitLab into your project folder. Push publishes your local commits to GitLab so others can use them. The safe rhythm is: pull → work/commit → pull → push.
In JupyterHub (Git sidebar)
Pull: Click Pull to fetch and merge the latest changes from GitLab into your local branch. Do this before you start working and again before pushing.
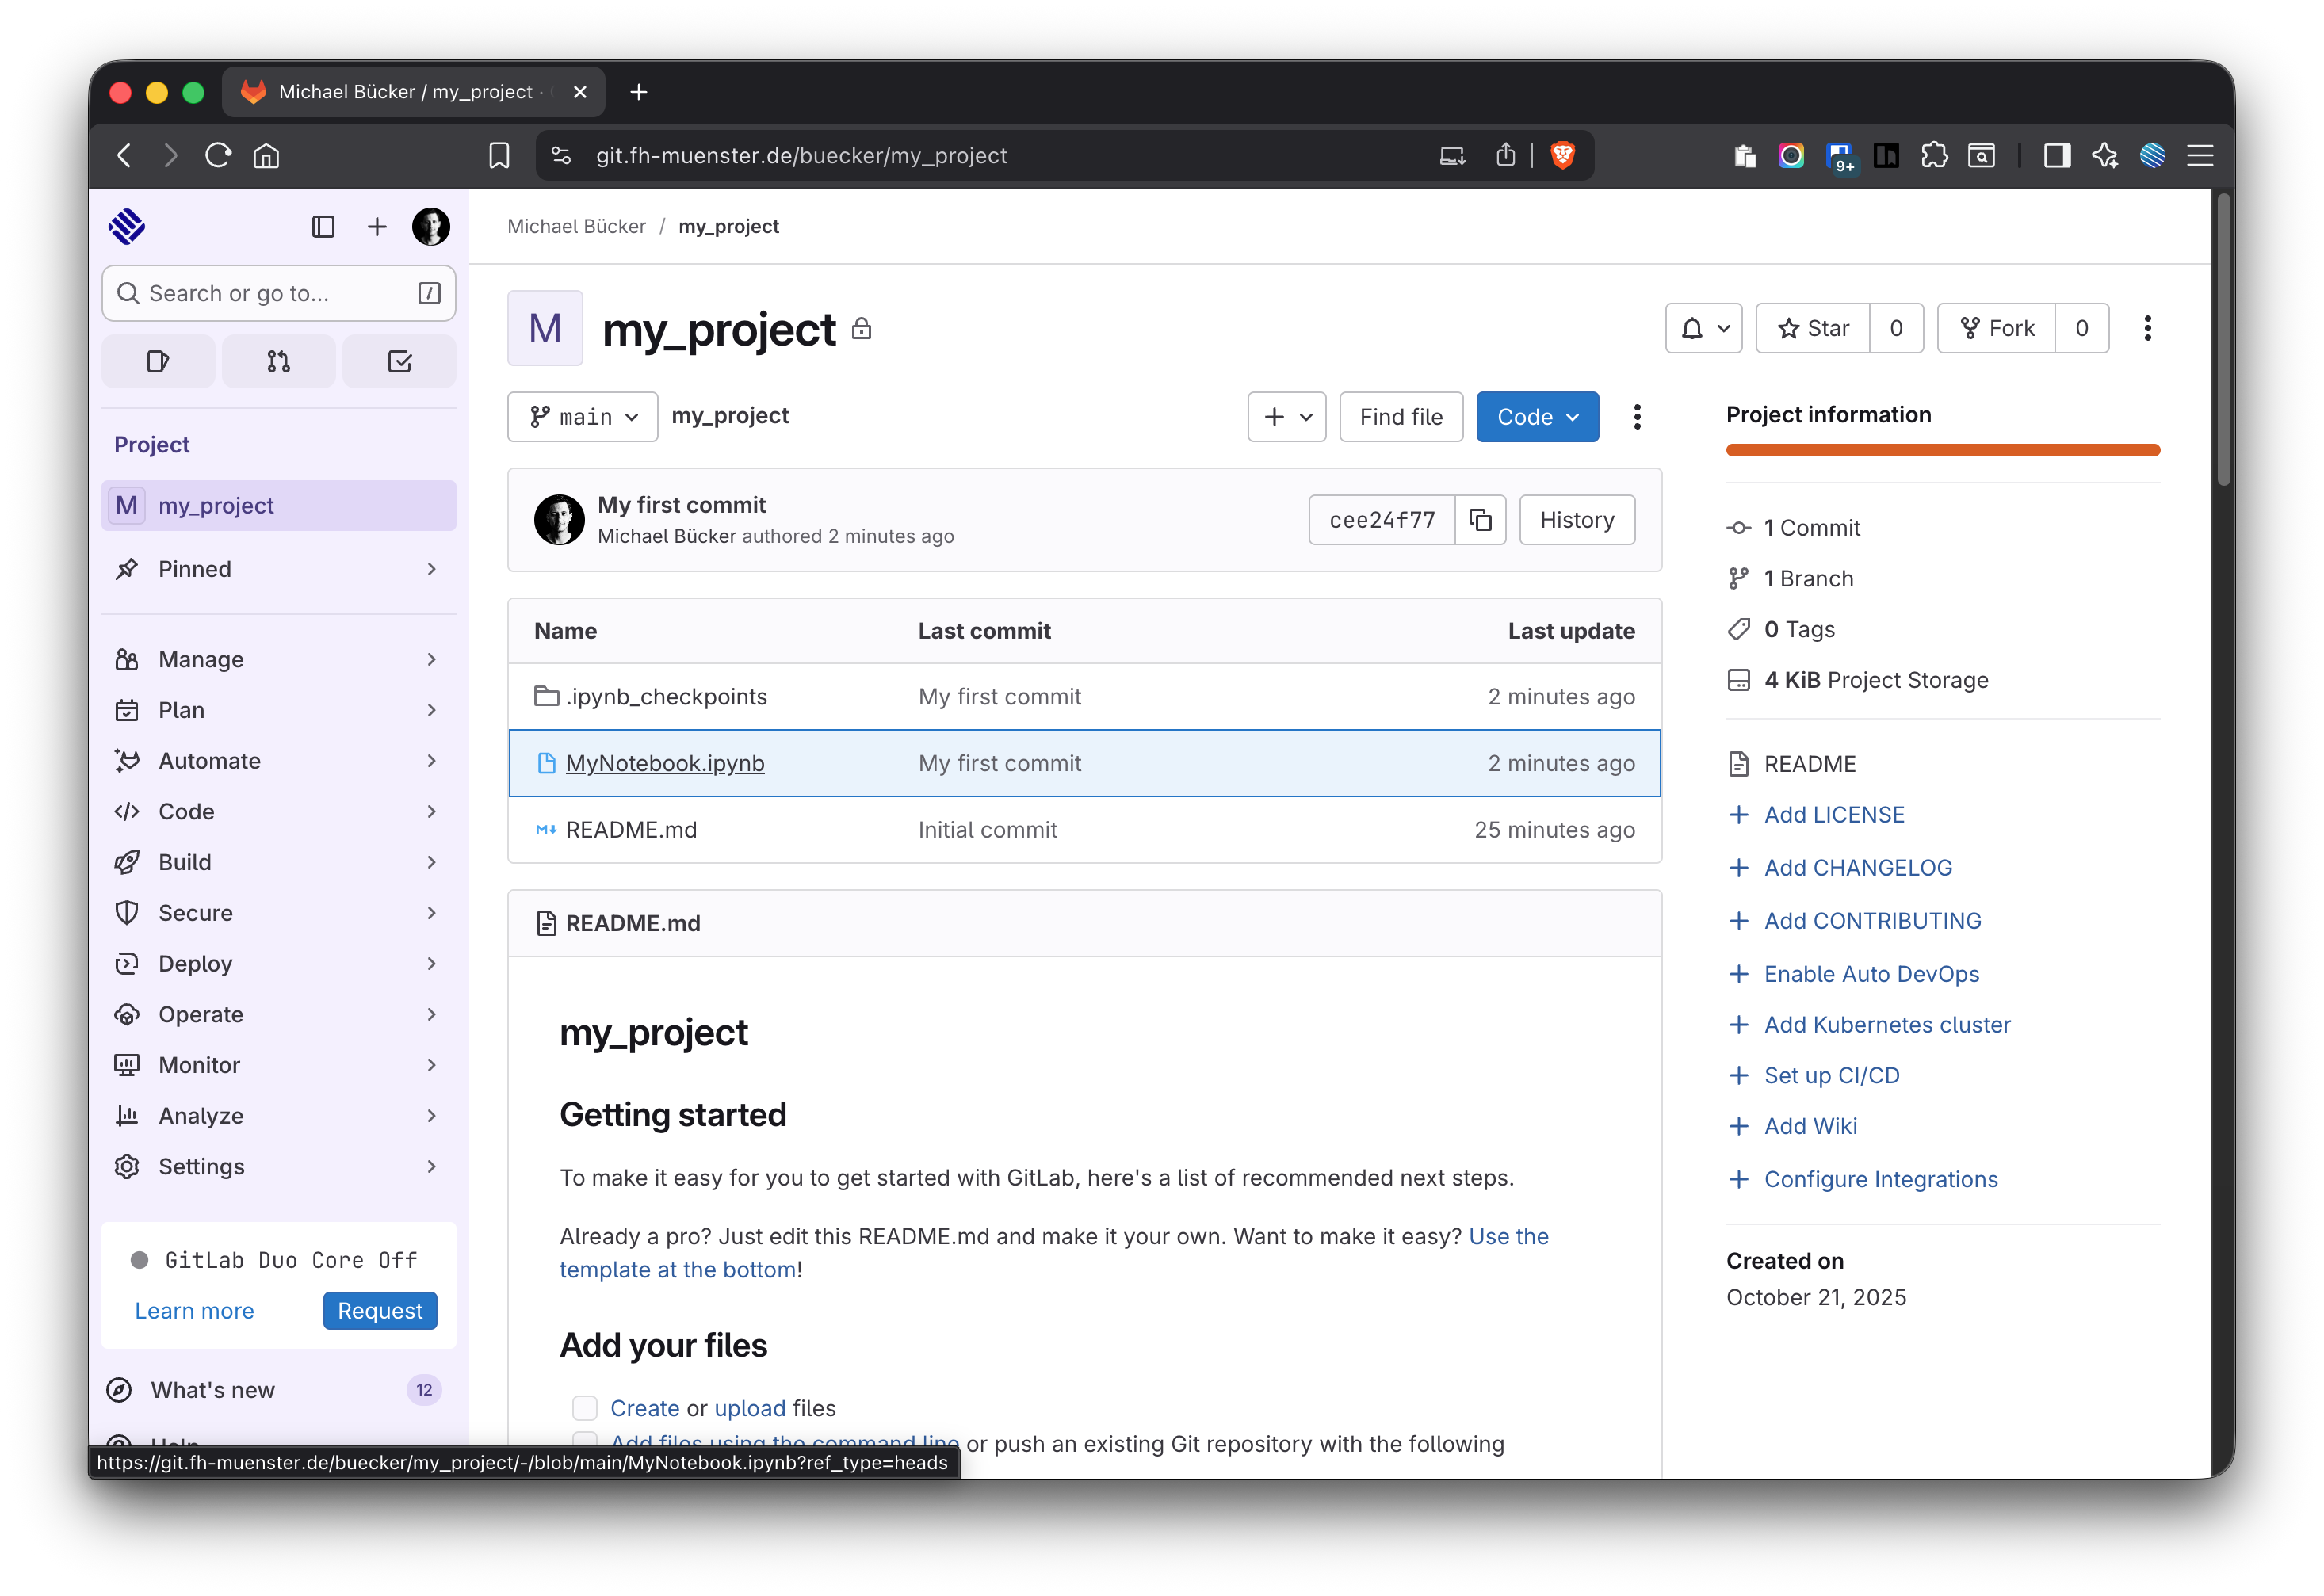
Push: After you have committed locally, click Push to upload your commits to GitLab (Figure 19, Figure 20 and Figure 21).
Figure 19: Push changes to the remote or pull from remote
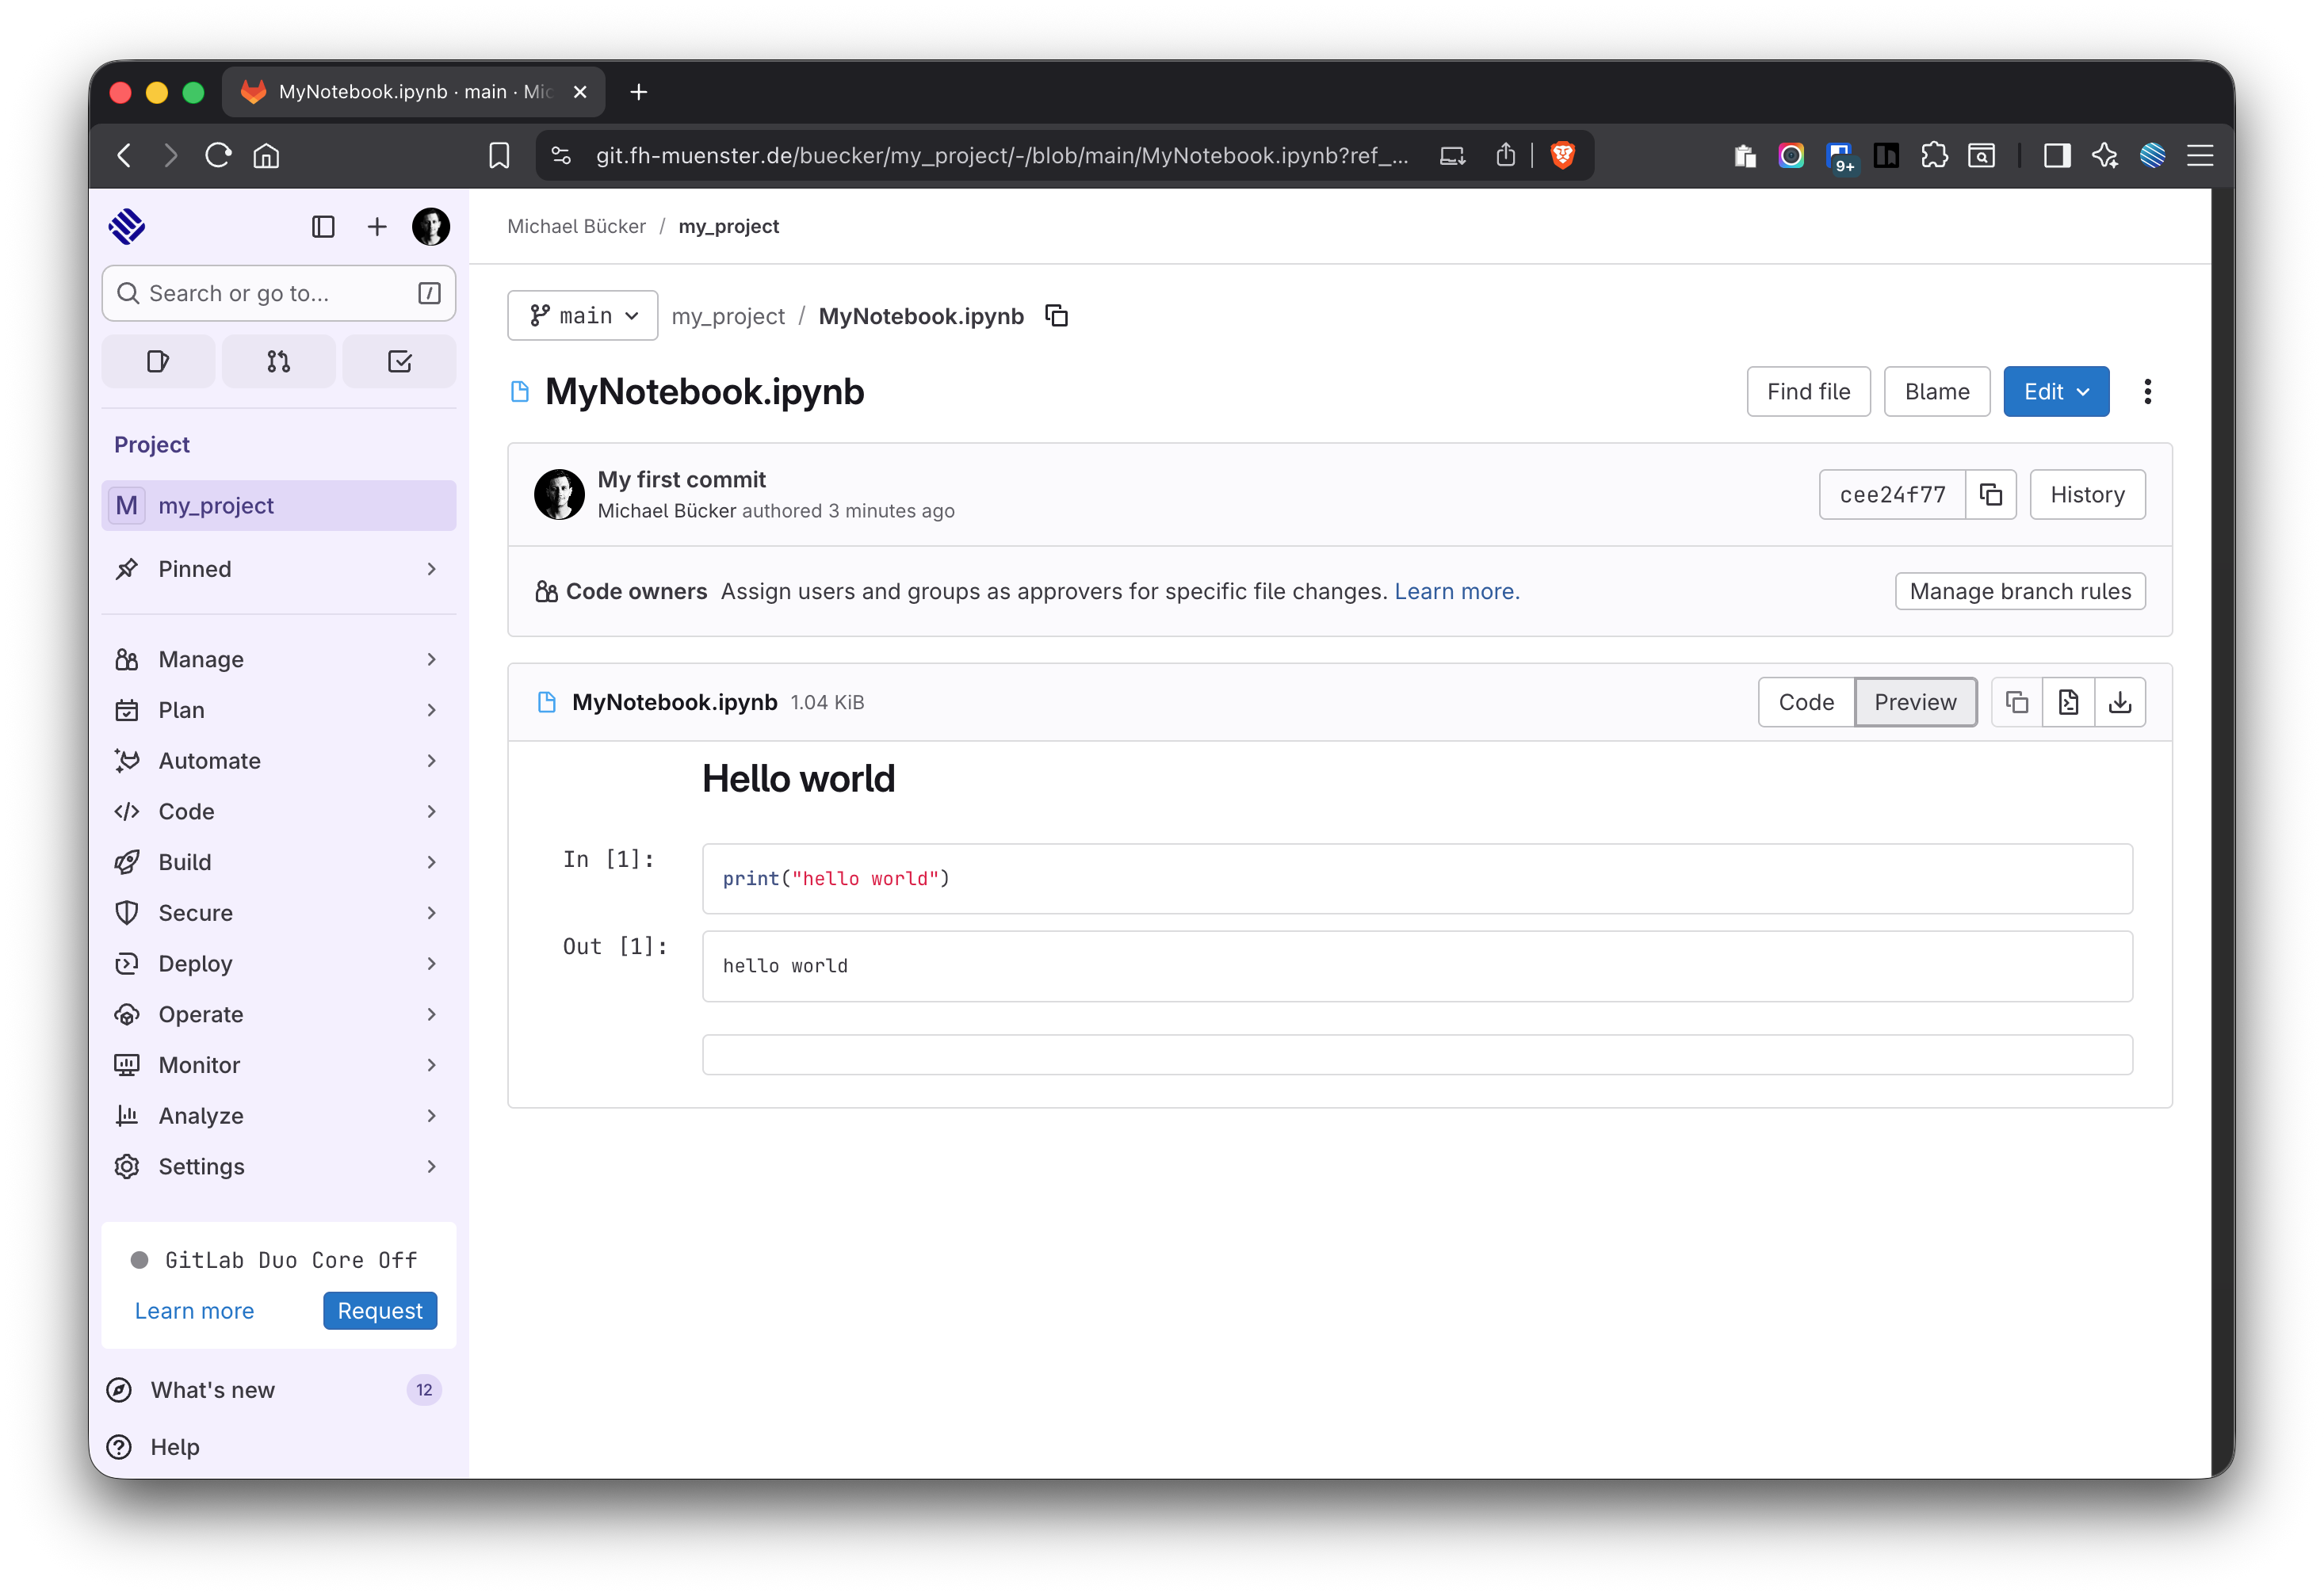
Figure 20: Pushed contents can now be found in GitLab
Figure 21: Pushed notebooks can be viewed in GitLab
4.3 Recommended team routine (with JupyterHub UI)
Start in your project folder (never the home directory).
Pull (get the latest from the remote repository).
Create/continue your branch (optional but recommended).
Work on notebooks/code; save regularly.
Stage relevant files in the Git panel and Commit with a clear message.
Pull again (to integrate any new remote changes); resolve conflicts if prompted.
Push your commit(s) so the team sees your work.
Open/merge a Merge Request on GitLab when your feature is ready.
4.4 Typical pitfalls & how to avoid them
Wrong location: Make sure the Git panel shows your project folder path before you clone/init.
Committing large data: Keep large raw data out of the repo (e.g., in data/raw/) and add it to your .gitignore. Commit code, small sample data, docs, and configs.
Notebook conflicts: Pull frequently. Coordinate edits on the same notebook or split work into separate notebooks (e.g., eda_01.ipynb, eda_02.ipynb). Move shared functions into src/ Python modules.
Vague commit messages: Use short, action-oriented summaries (what you changed and why it matters).